-
News & Updates
camera
October 5, 2017
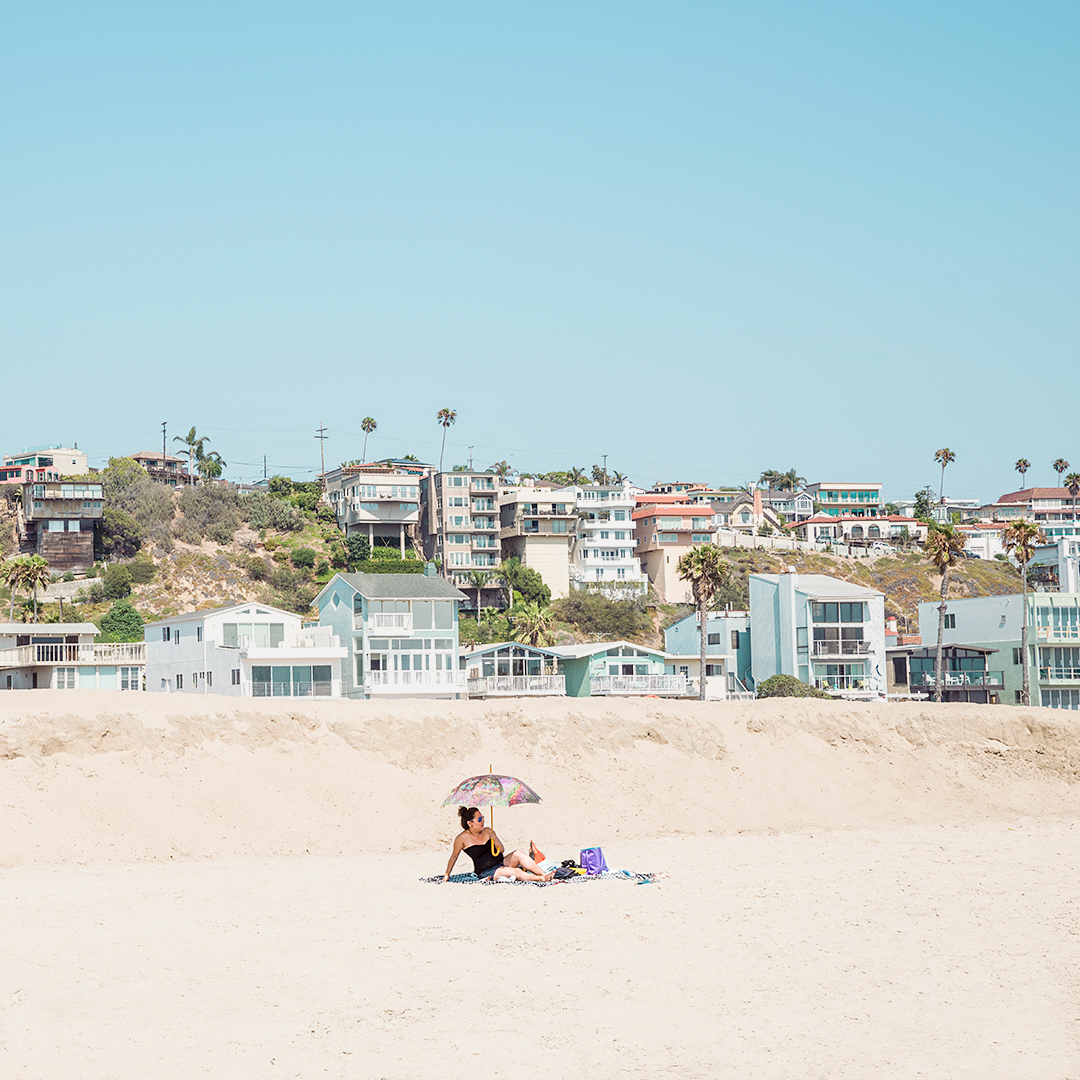
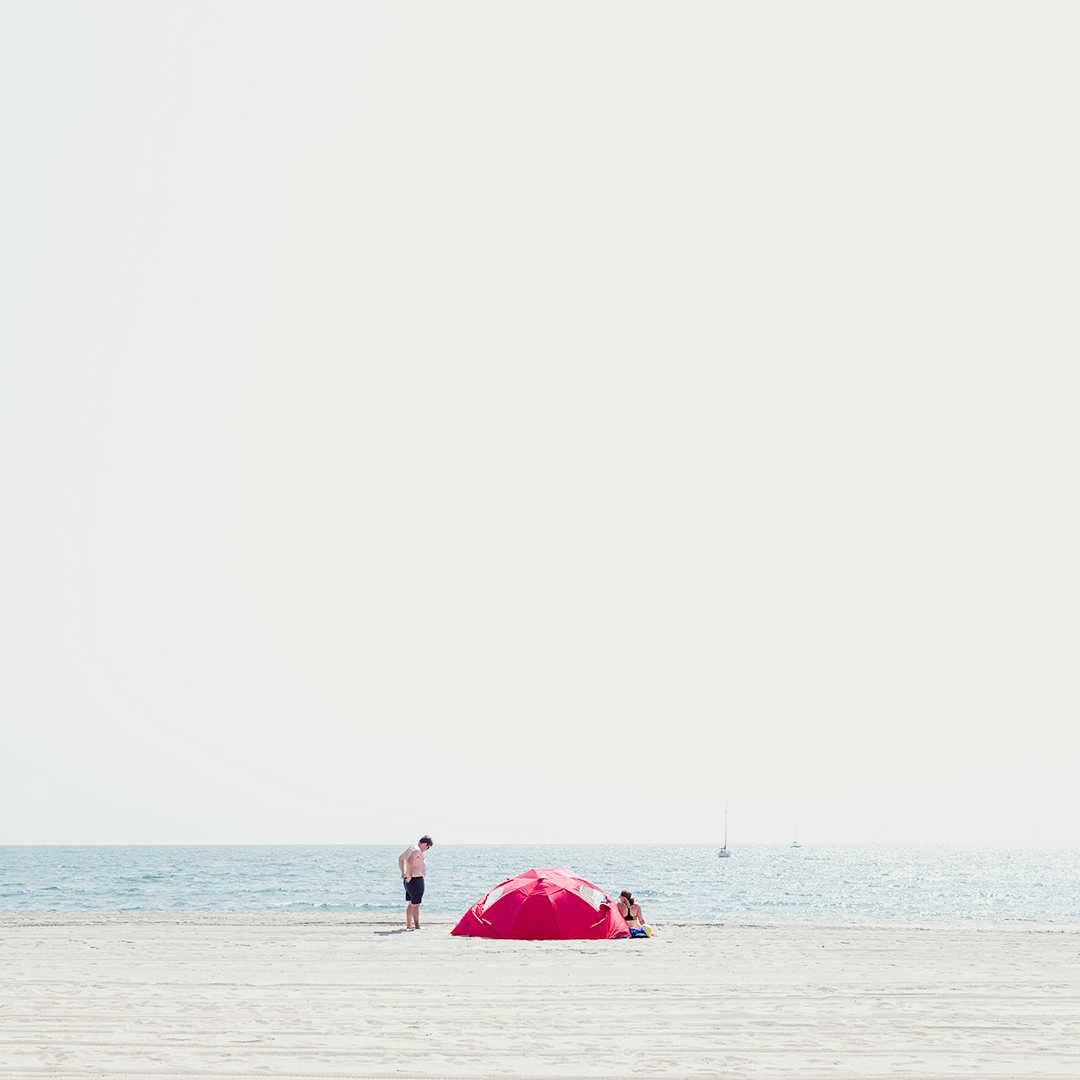
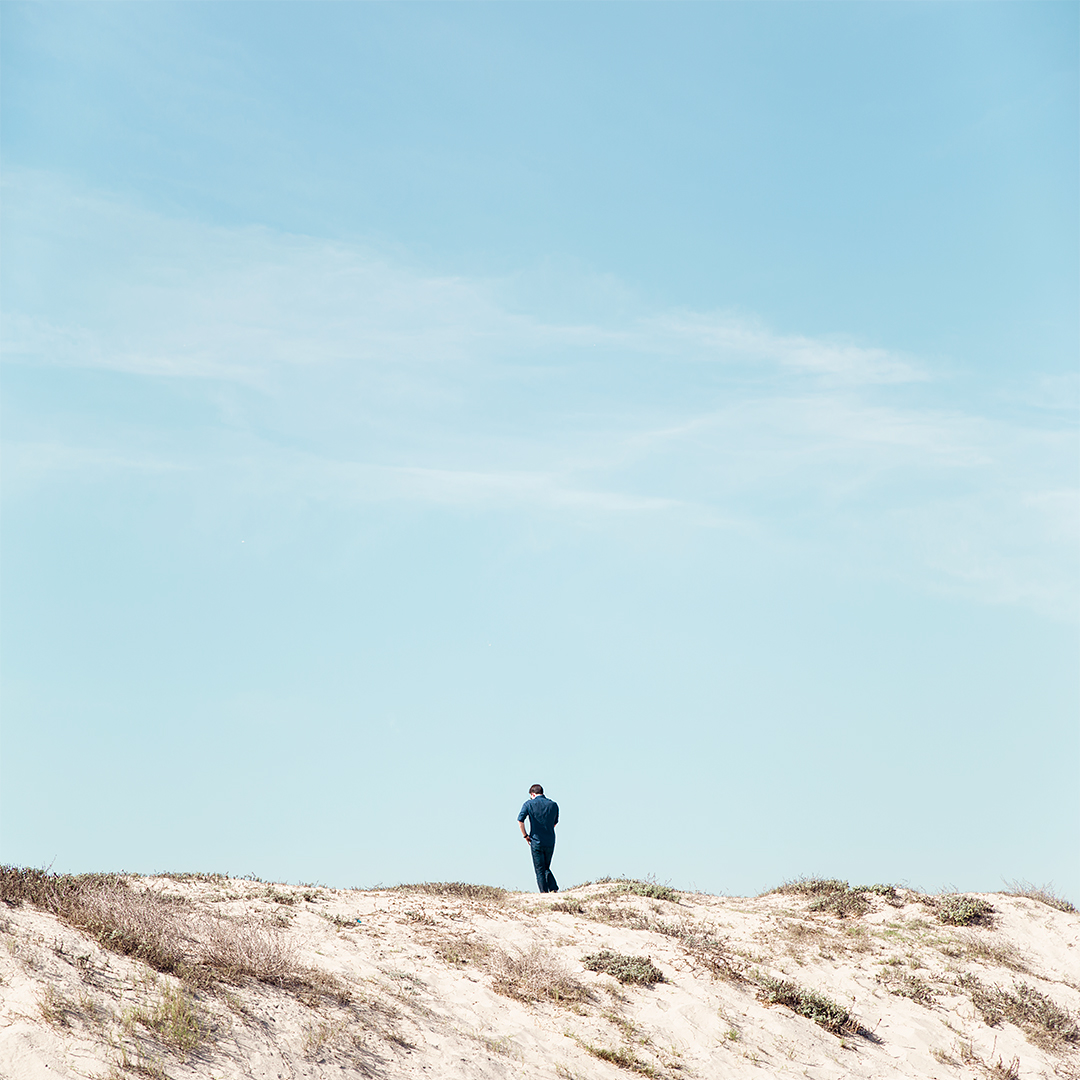
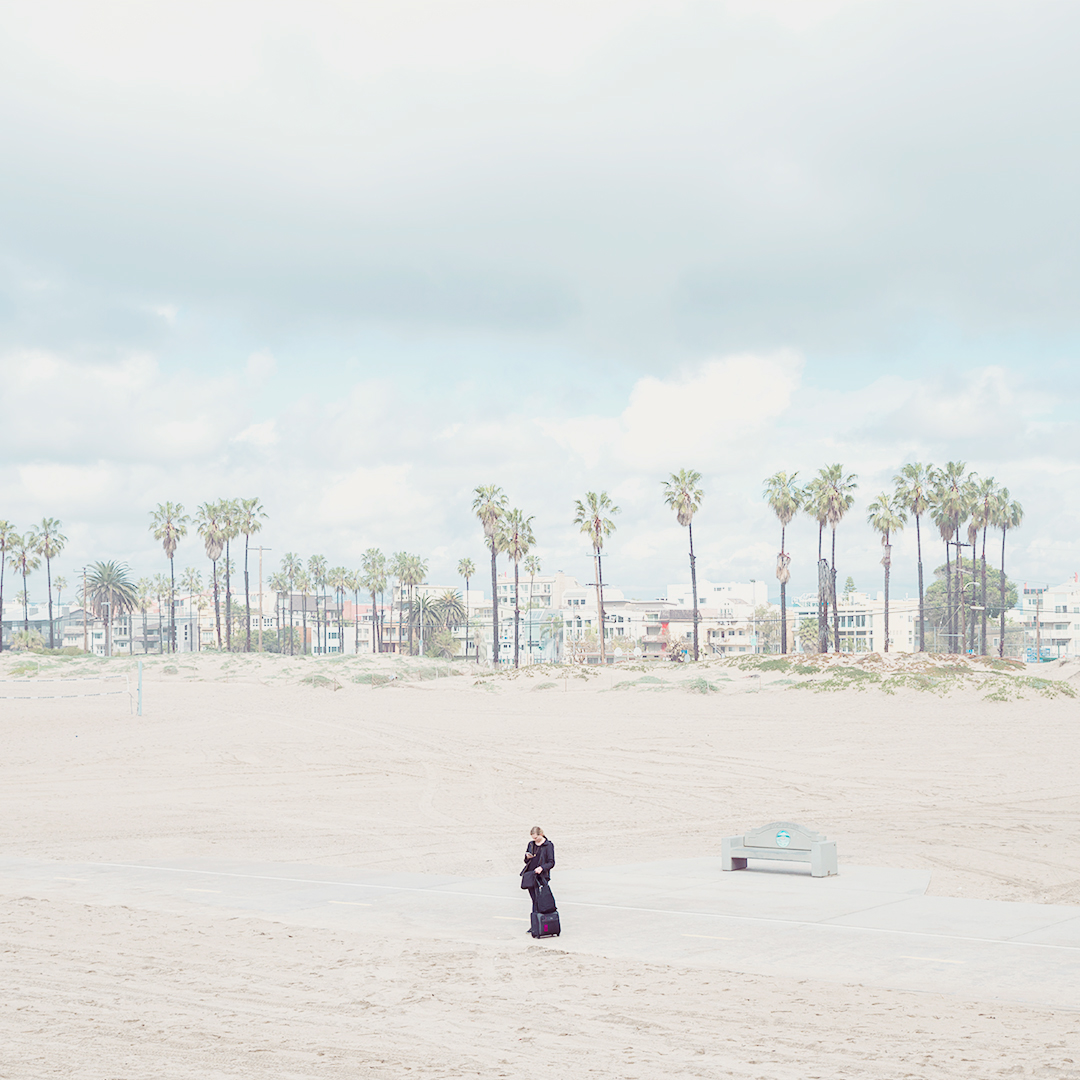
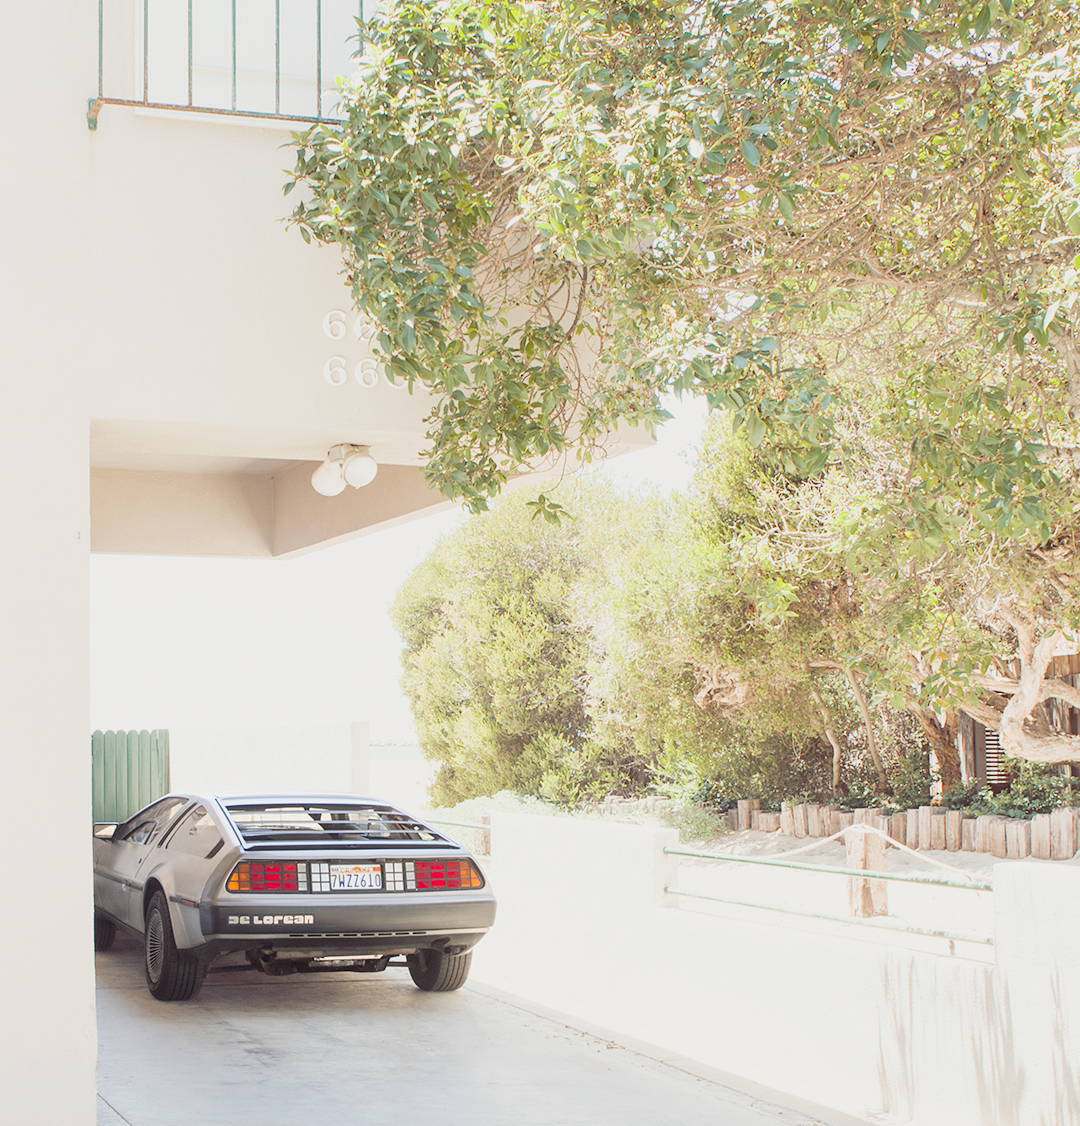
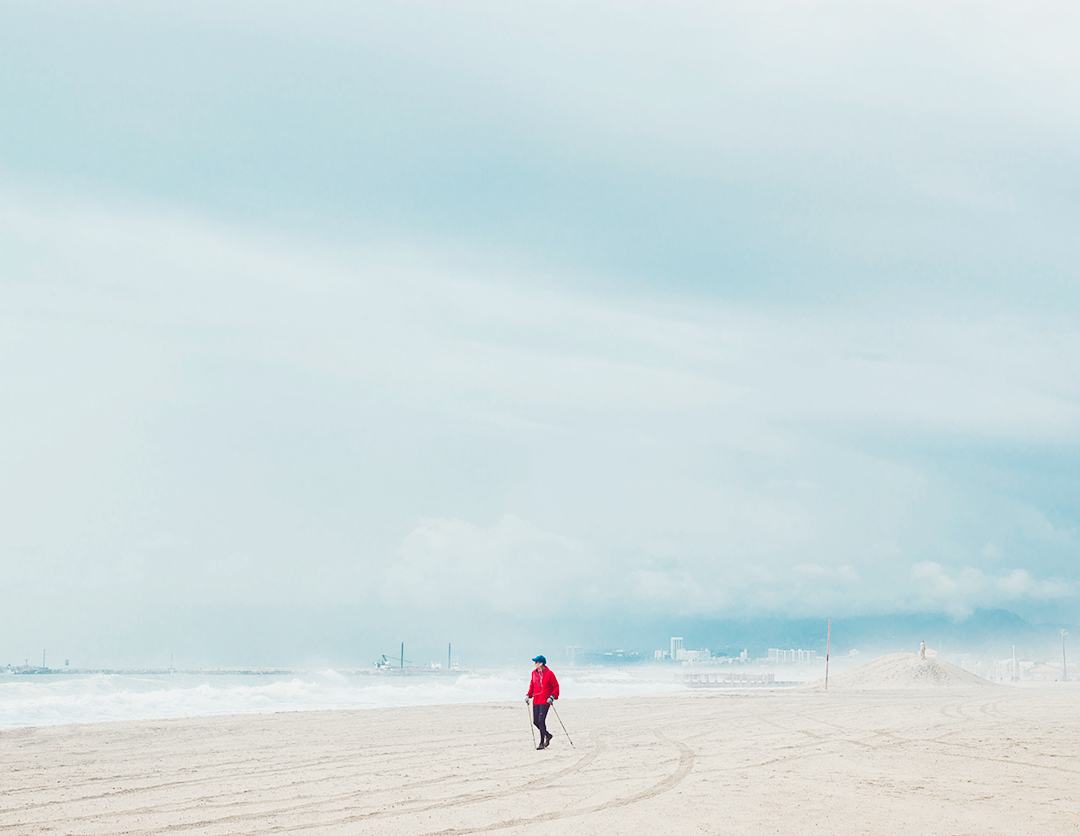
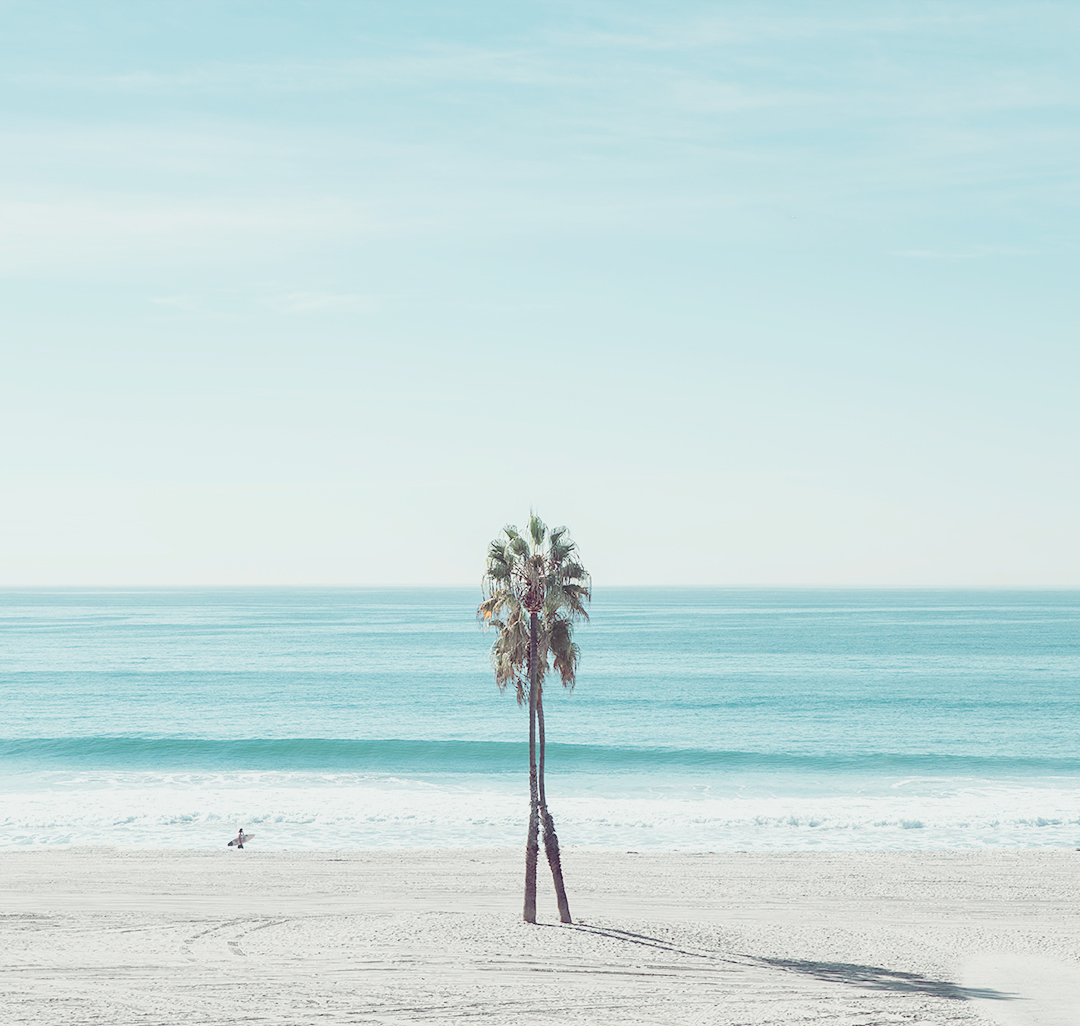
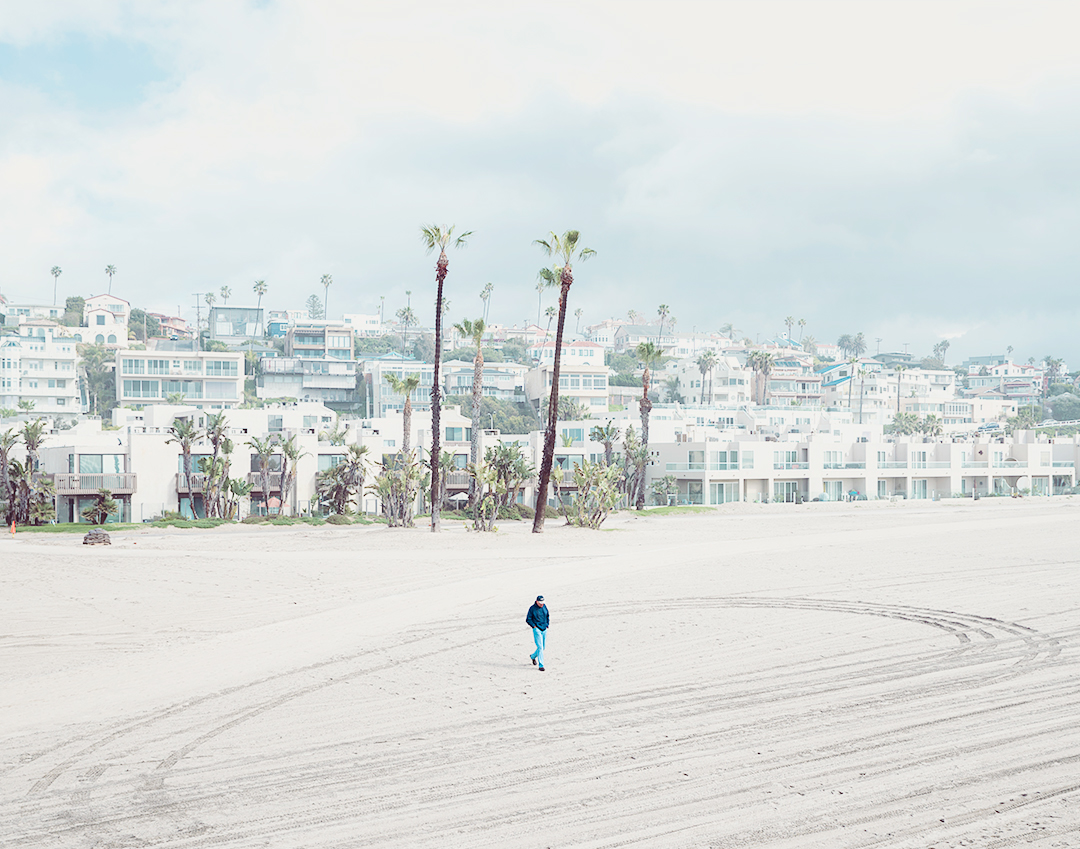
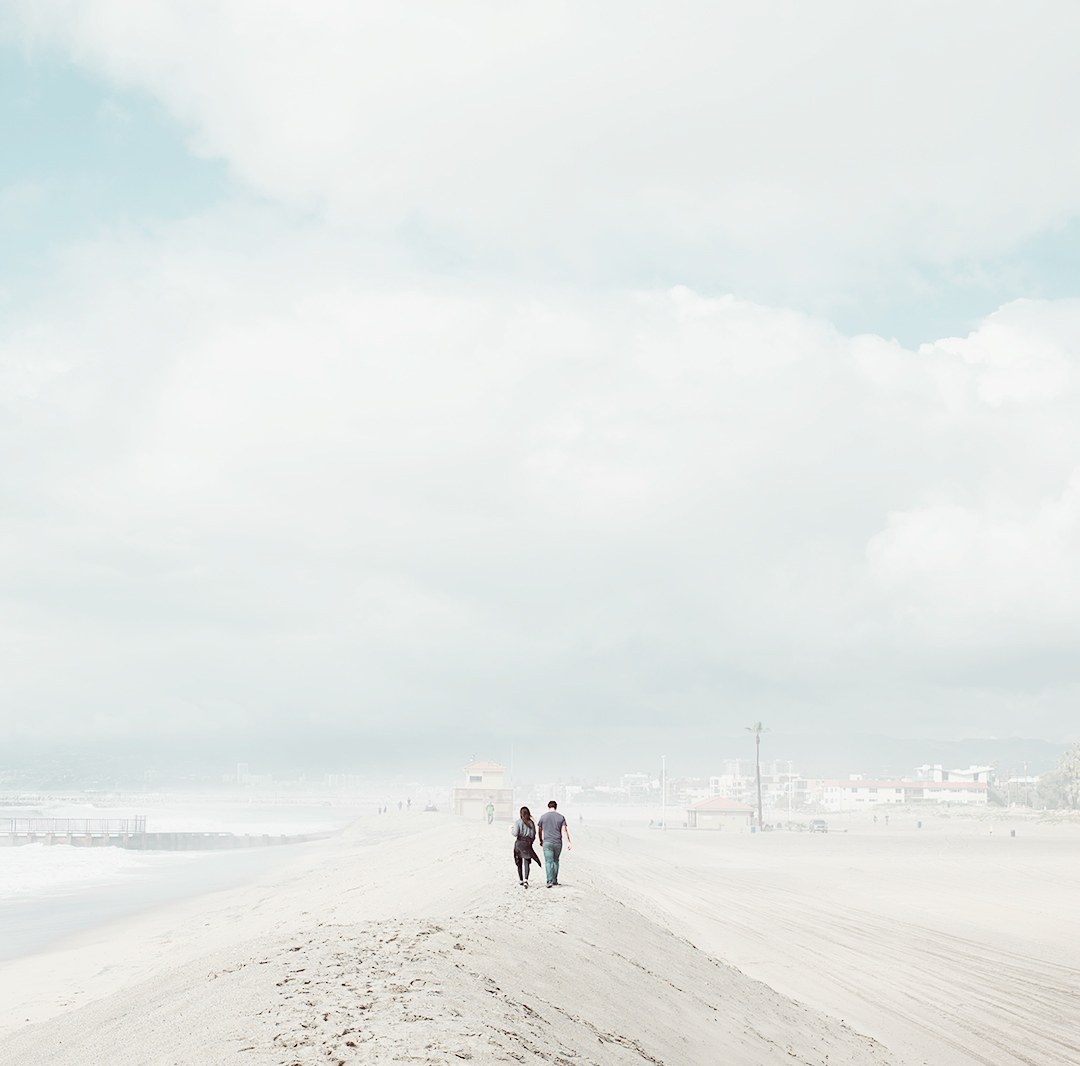
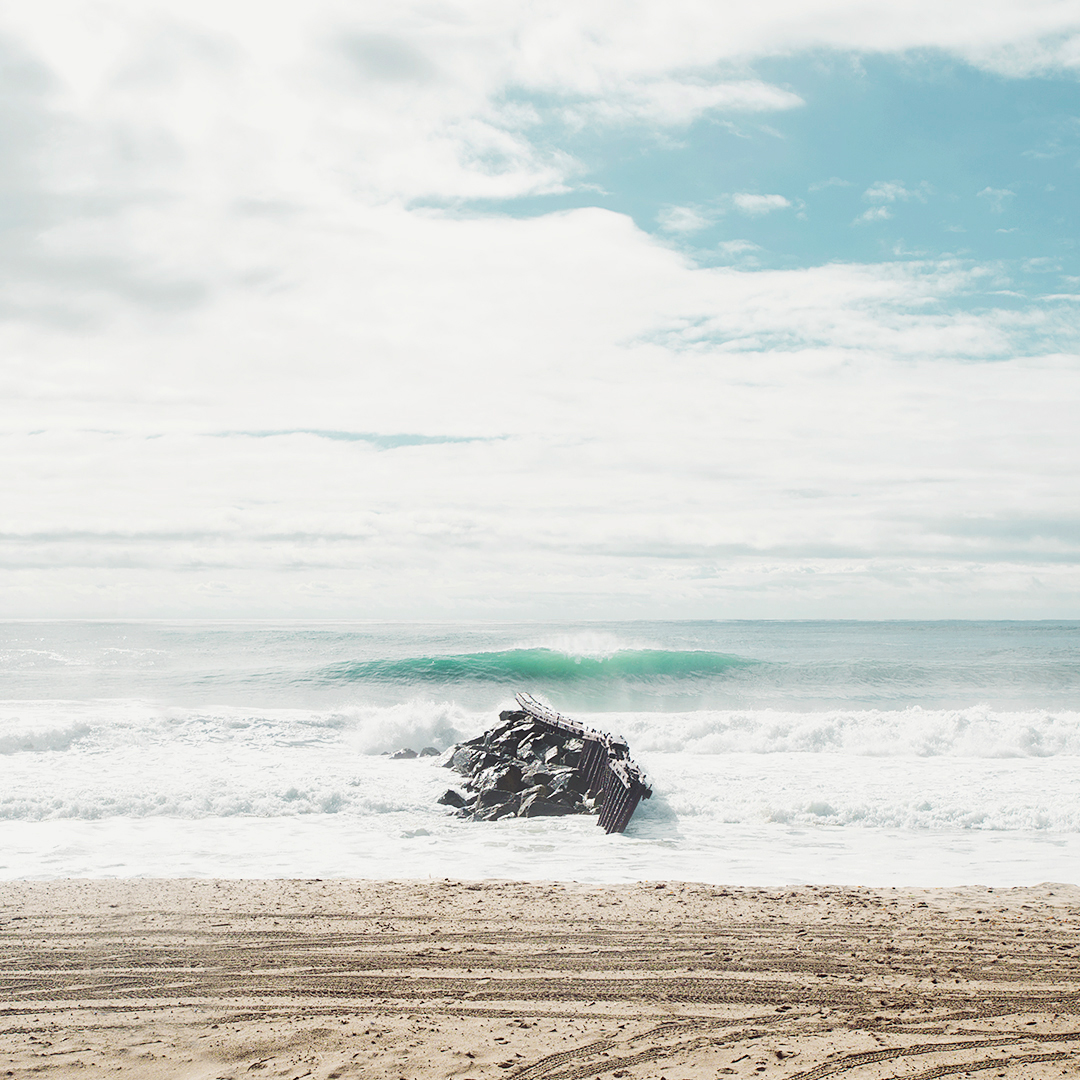
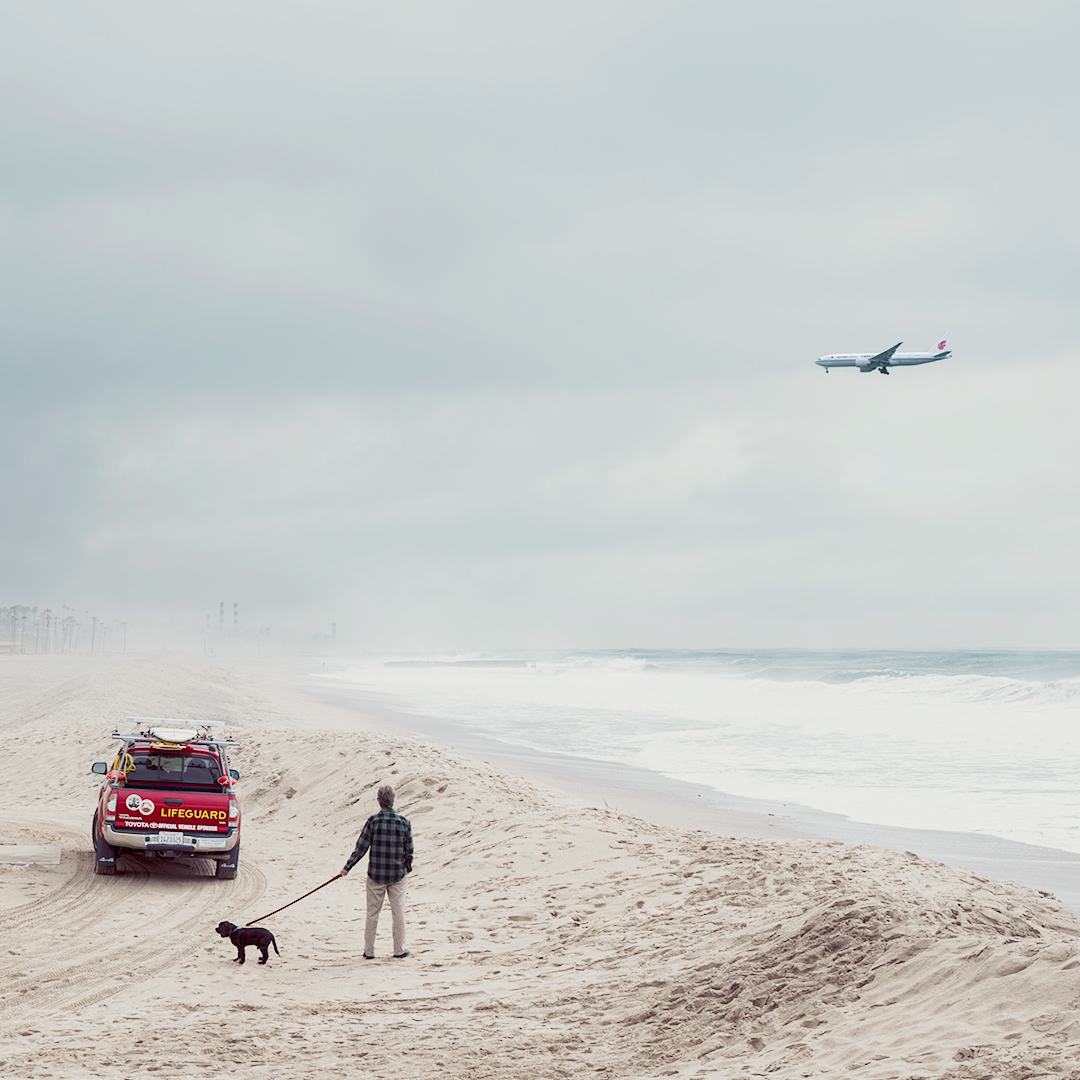
Soothing California Beach Photography by David Behar
Soothing California Beach Photography by David Behar
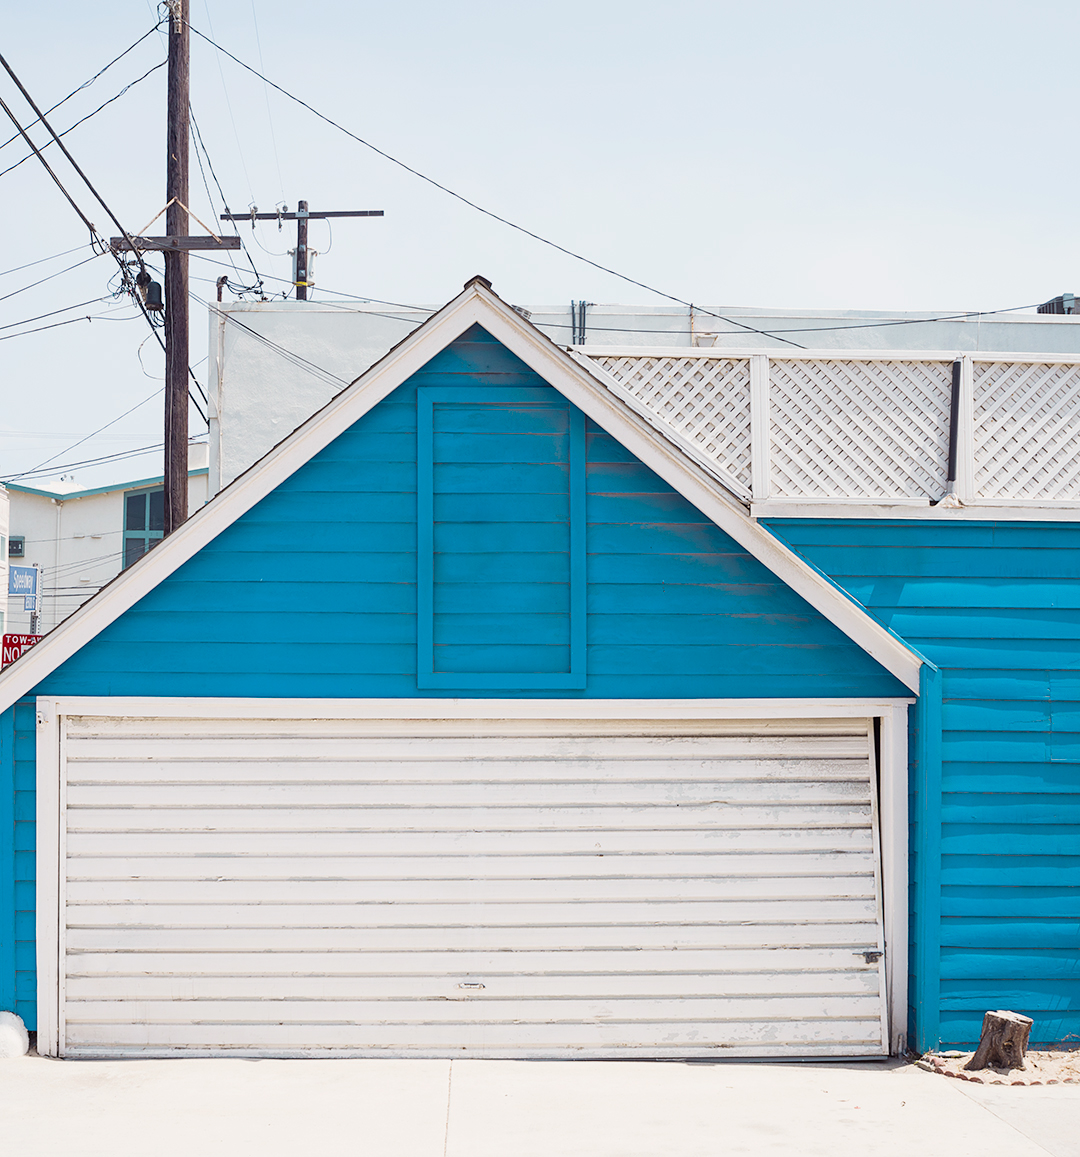
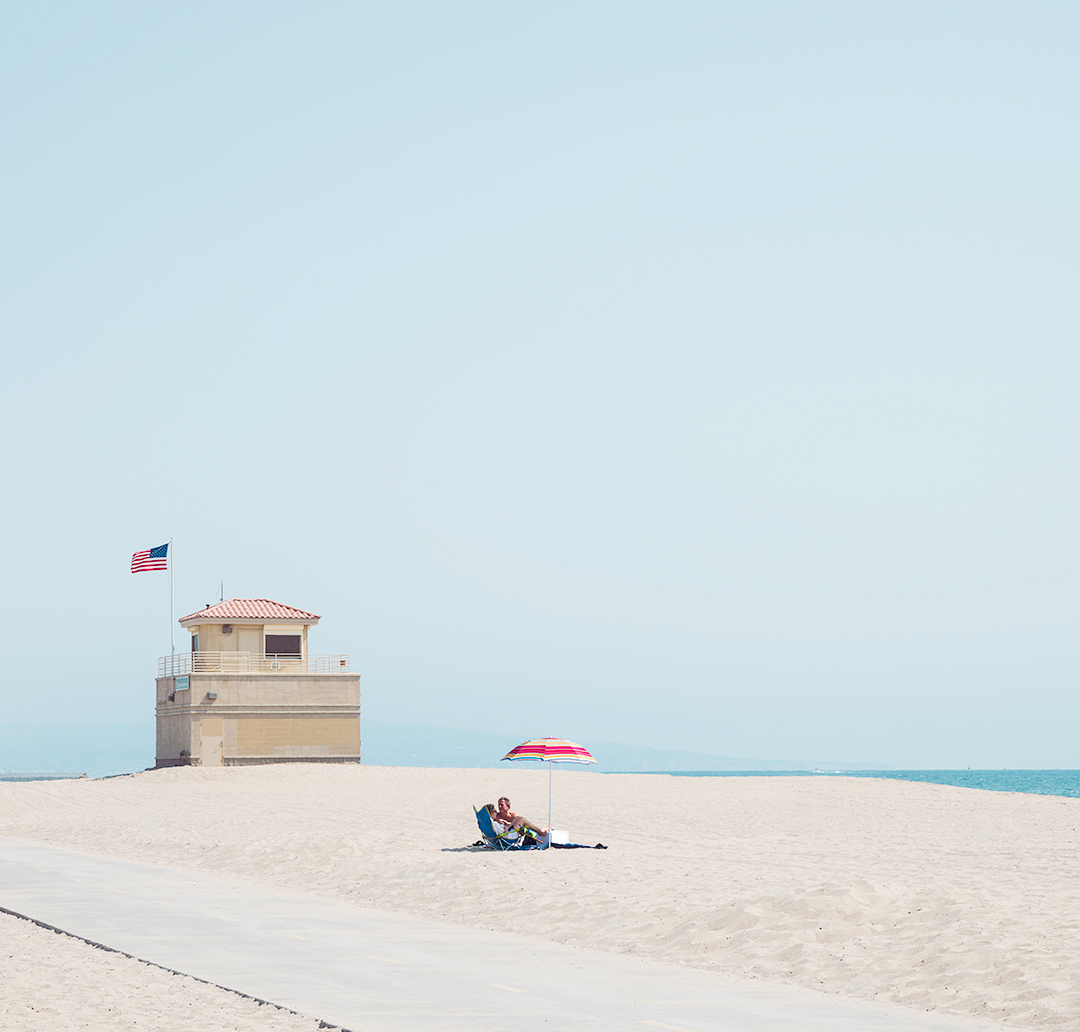
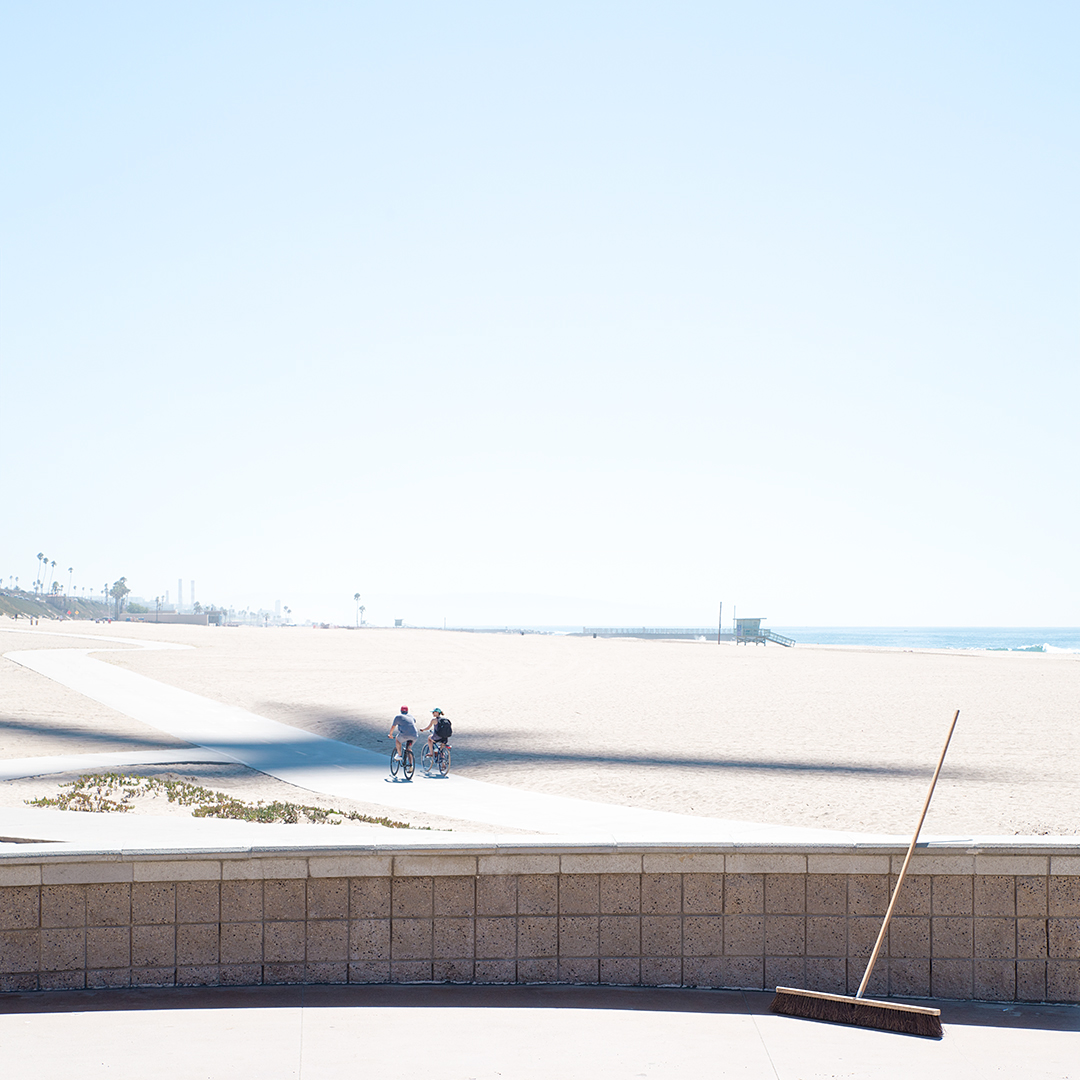
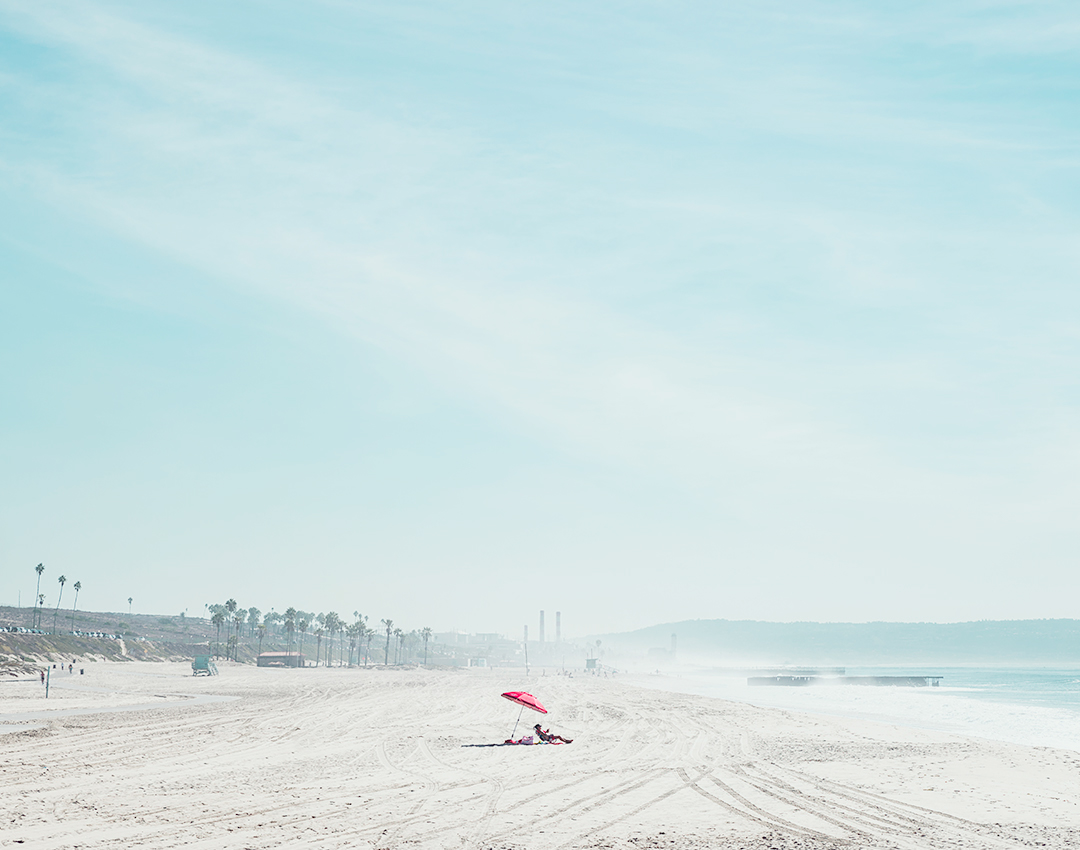
David Behar, a photographer from Los Angeles, California has shared a beautiful set of photography work titled Playa del Rey. In my opinion, he was able to capture the spirit of the beaches in southern California with a blue/teal/green color palette that is leans towards the cool spectrum. The photos also have a minimalist look with clean compositions and the ever present blue sky. I have been spending my vacations in Santa Barbara for the past 3 years and I’ve never been able to translate the feeling but now I can just point to David’s photos.
Photography


More information visit:
abduzeedo
Oct 05, 2017
Source: Abduzeedo Photography
October 5, 2017
SXSW Place by Design Entry Tips: Deadline October 13
Place by Design is SXSW’s public space design competition, highlighting transformative work at the intersection of art, technology, and design that rethinks how we use and interact with the places around us. All artists, designers, community organizers, and entrepreneurs working in transforming the public realm are encouraged to apply. Selected applicants will present their work in a fast-paced pitch competition in the Cities Summit at SXSW (March 12-13, 2018).
Public space is a democratized testing ground for artists, designers, technologists, and entrepreneurs. What better place for them to speak about their work than SXSW, where the city of Austin becomes a thriving, active public space? Small-scale, site-specific projects that transform underutilized aspects of the built environment have the potential to enhance the public good through social interaction, education, civic engagement, health, and much more. Place by Design is a celebration of this work, and a chance for these ideas to gain new practitioners and scale.
Tips for Entry
- Place by Design is about transformation – Projects that transform underutilized urban fabric into something useful, interactive or beautiful. Surprise us!
- Anyone can apply – No formal accreditation is necessary; student work is accepted.
- Work needs to have achieved implementation in the past two years – Because the work is in part judged on impact, speculative design work is not accepted for this year’s program.
- Place by Design is not for fundraising – If you’re seeking investors for your idea, check out the SXSW Accelerator Pitch Event. PXD is for telling the story of your design, why and how it worked, and what it ultimately means (in under five minutes).
If you have additional questions about the program or application process, please contact citiessummit@sxsw.com. Get inspired by watching presentations from last year here.
Place by Design Applications Close: Friday, October 13, 2017 at 11:59pm PT
Join Us March 9-18, 2018
Register for SXSW 2018 by Friday, October 20 and save. Make your hotel reservations through SXSW Housing & Travel for the best available rates. We hope to see you in March!
2016 Place by Design Outdoor Lounge – Photo by Steve Rogers
The post SXSW Place by Design Entry Tips: Deadline October 13 appeared first on SXSW.
Source: SxSW Interactive
October 4, 2017
Samsung Odyssey hands-on review
Samsung’s Odyssey brings high-resolution OLED screens, a wider field of view, more adjustability, and even built-in headphones, making it the best Windows Mixed Reality HMD yet.
The post Samsung Odyssey hands-on review appeared first on Digital Trends.
Source: Digital Trends VR
October 4, 2017
Windows Mixed Reality hands-on review
The first Windows Mixed Reality headsets arrive in two weeks. In a sneak preview, we had a chance to gun down aliens, explore ancient ruins, and chill in an extravagant Cliff House. Here’s what you’re in for.
The post Windows Mixed Reality hands-on review appeared first on Digital Trends.
Source: Digital Trends VR
October 4, 2017
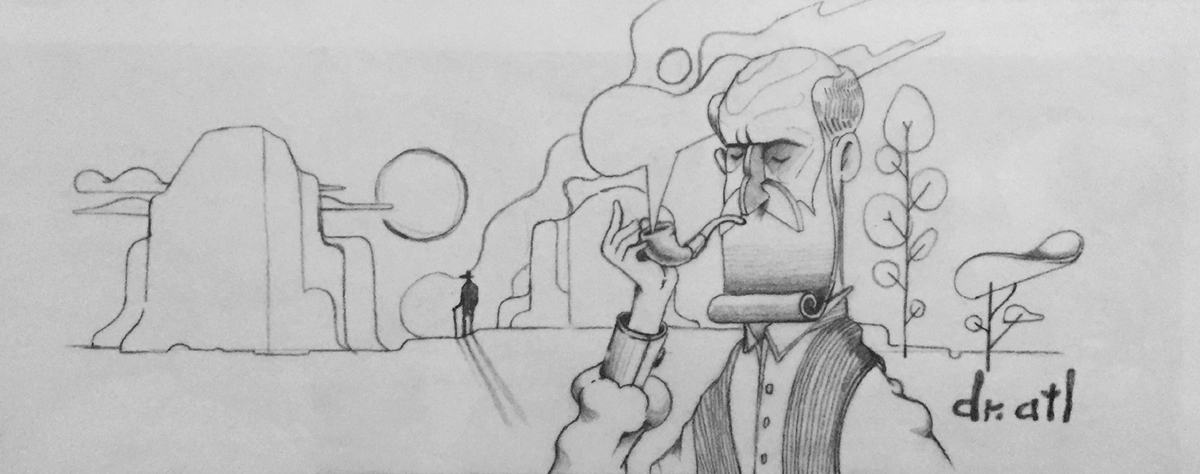
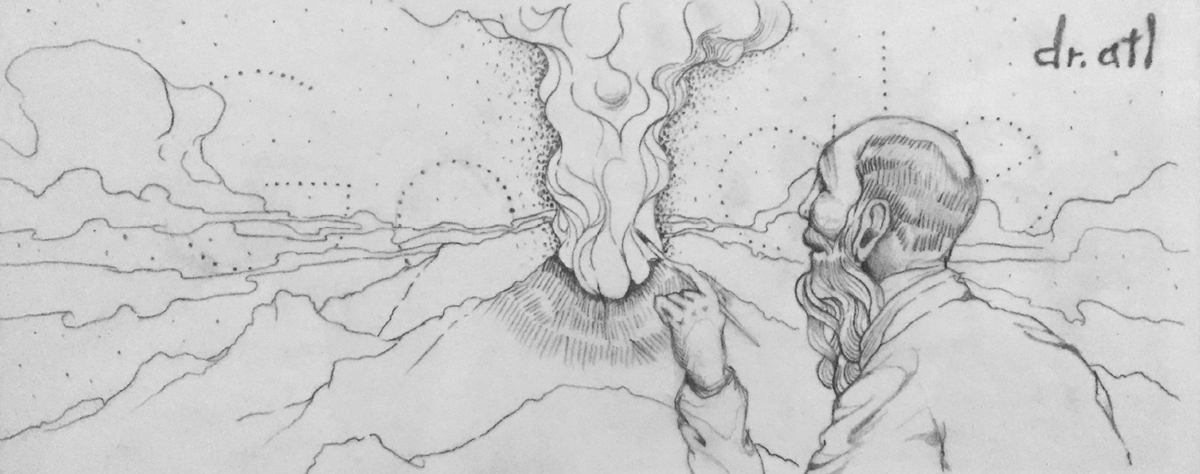
Beautiful Google Doodle Illustration by Julian Ardila
Beautiful Google Doodle Illustration by Julian Ardila
Julian Ardila and illustrator from Mexico shared a beautiful illustration work he’s done for a Google Doodle. The Doodle celebrates “Dr. Atl,” born Gerardo Murillo in Guadalajara in 1875. In a time of revolution and renaissance, Murillo greatly influenced Mexico’s political and cultural identity. He was an activist, artist, writer, journalist, and overall cultural leader.Murillo pioneered the idea of artistic nationalism. The illustration is full of style, it has this watercolor look but with a lot of depth. Julian was also really nice to share with us a bit of the process, check it out.
Description
To show his pride in his Mexican heritage, he took on the name “Atl,” meaning water in Náhuatl. He worked his entire life to promote Native Mexican culture, writing extensively on folk art, music, and dance. Murillo loved nature, and in volcanoes, he found his greatest inspiration. He frequently hiked to Popocatépetl and Iztaccíhuatl, living and painting on the volcanic slopes for weeks at a time. In 1943, he witnessed the birth of Paricutín and documented the experience in his book “Cómo nace y crece un volcán, el Paricutín” (How a Volcano Is Born and Grows – Paricutín). For his contributions to the artistic and cultural heritage of Mexico, he was awarded the Belisario Domínguez Medal of Honor and the National Arts Award.
Final Google Doodle

Illustration process


For more information about Julian check out:
abduzeedo
Oct 04, 2017
Source: Abduzeedo Illustration
October 4, 2017
Art Tributes for the upcoming Blade Runner 2049 movie
Art Tributes for the upcoming Blade Runner 2049 movie
Alright, gloves off. The sci-fi sequel movie who has been in the making for the last 30 years is coming to theaters (this week). Let’s welcome Blade Runner 2049! Bringing us back in the futuristic universe of replicants, we also get the return of Rick Deckard played by Harrison Ford himself. I can’t wait watch this movie, the first mastery definitely changed the genre. By the meantime, let’s take a step back and enjoy these art tributes!
Here is the synopsis of the movie: Officer K (Ryan Gosling), a new blade runner for the Los Angeles Police Department, unearths a long-buried secret that has the potential to plunge what’s left of society into chaos. His discovery leads him on a quest to find Rick Deckard (Harrison Ford), a former blade runner who’s been missing for 30 years.
More Links
- Learn more about the movie Blade Runner 2049 movie
Credited Images
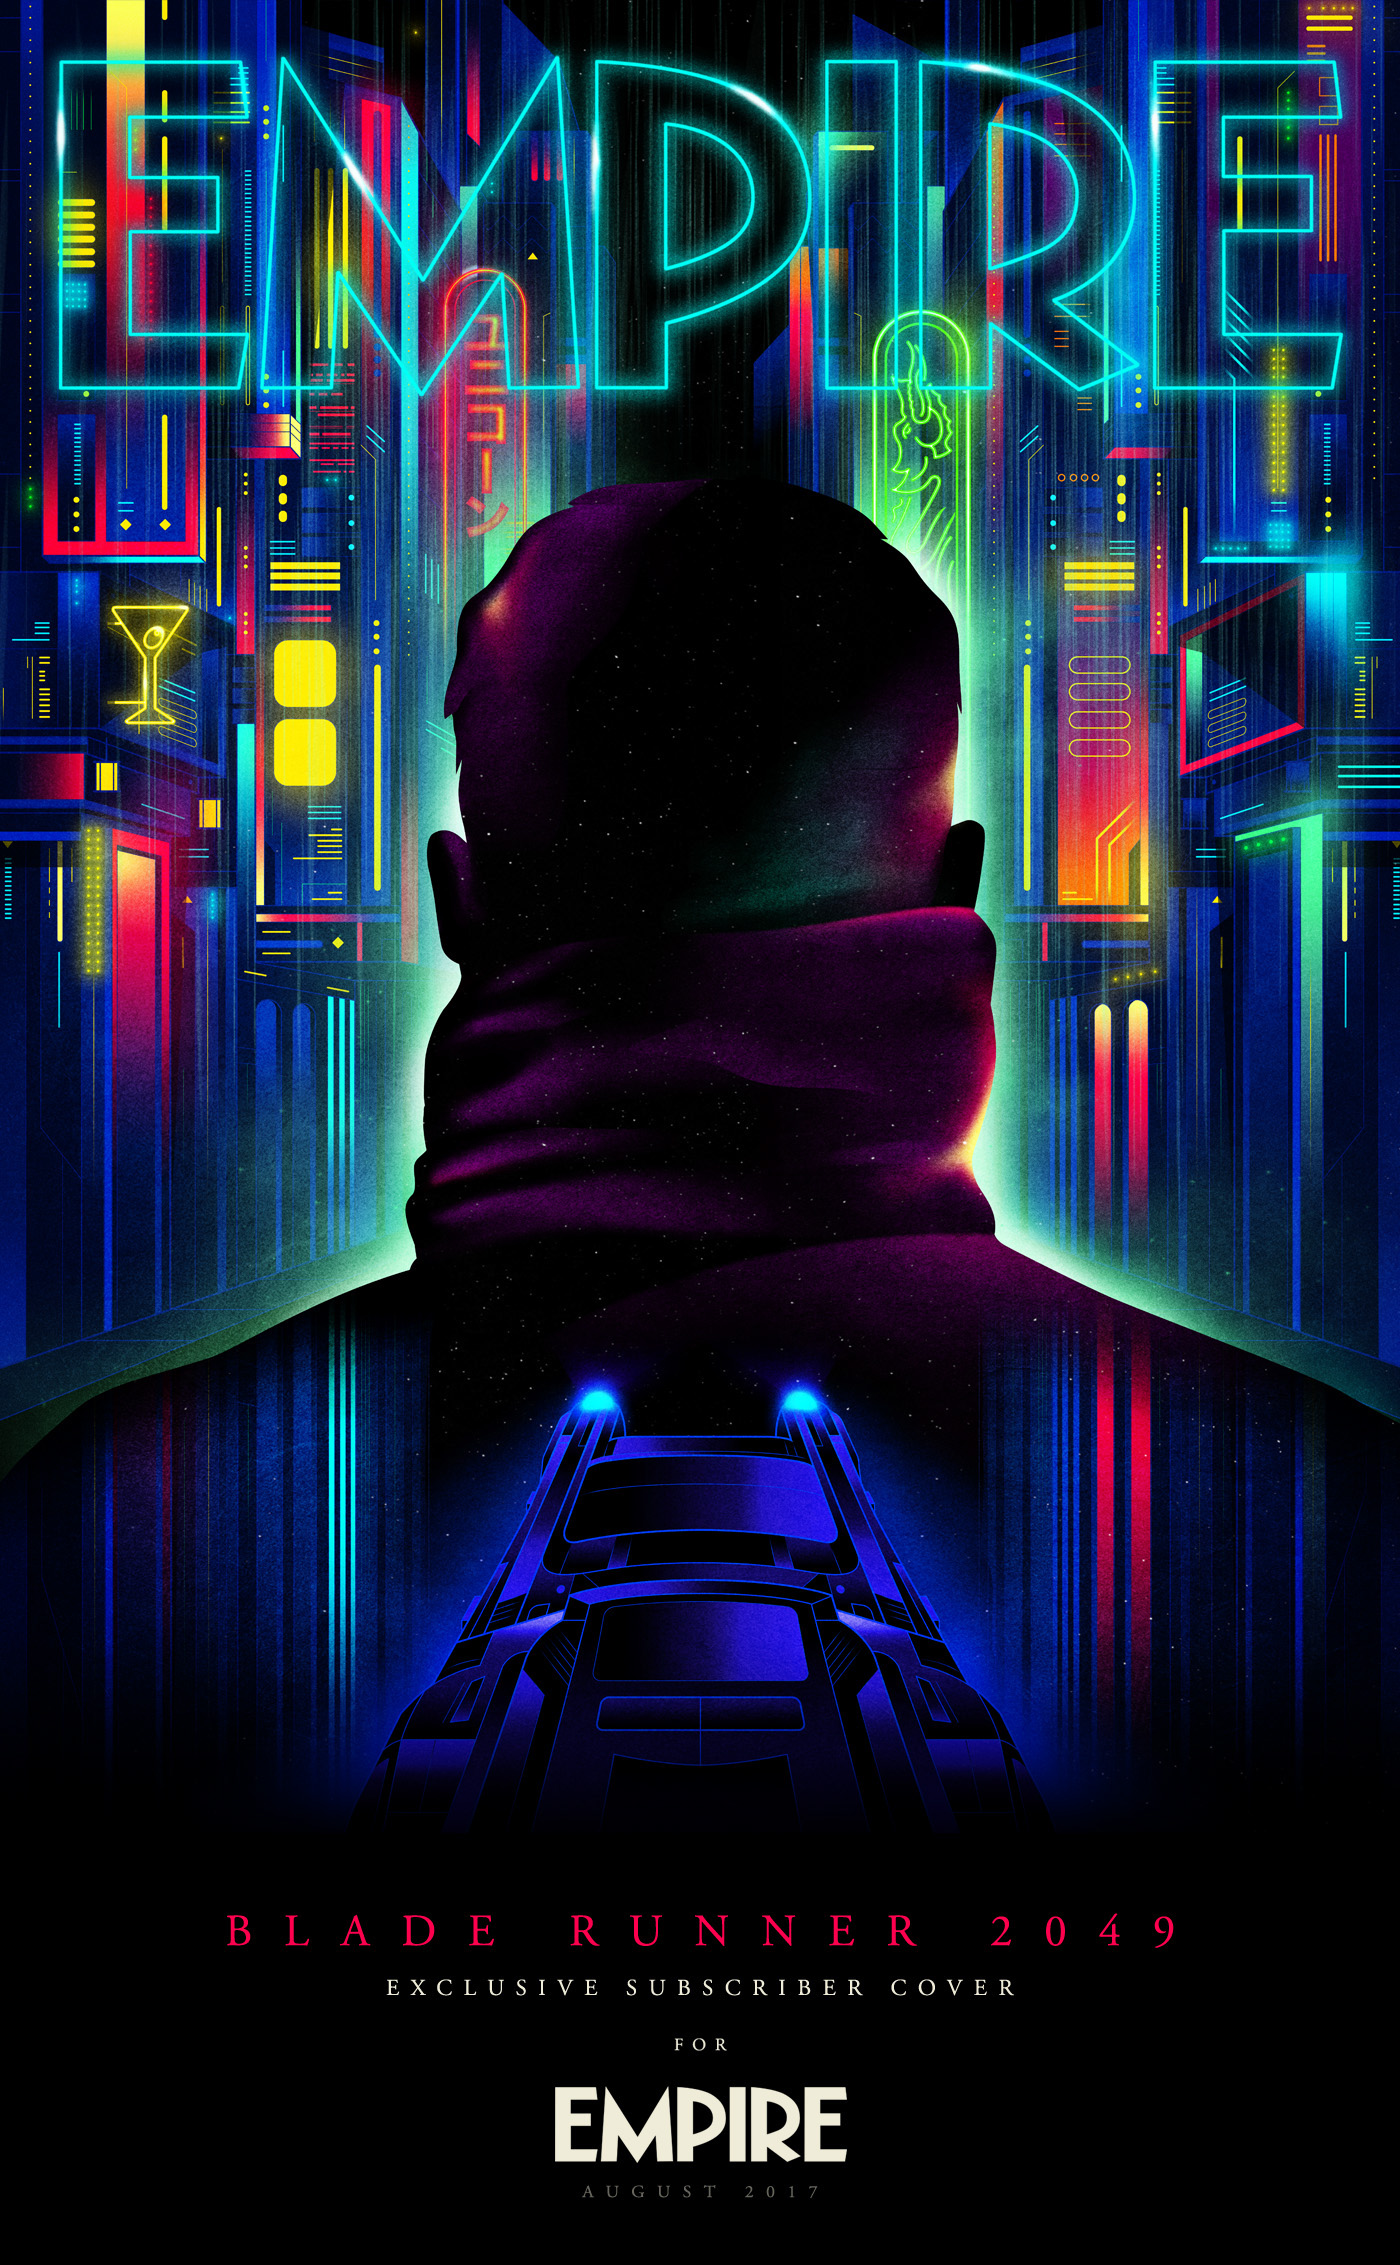 Design by Van Orton Design®
 Design by Manuel Rovira
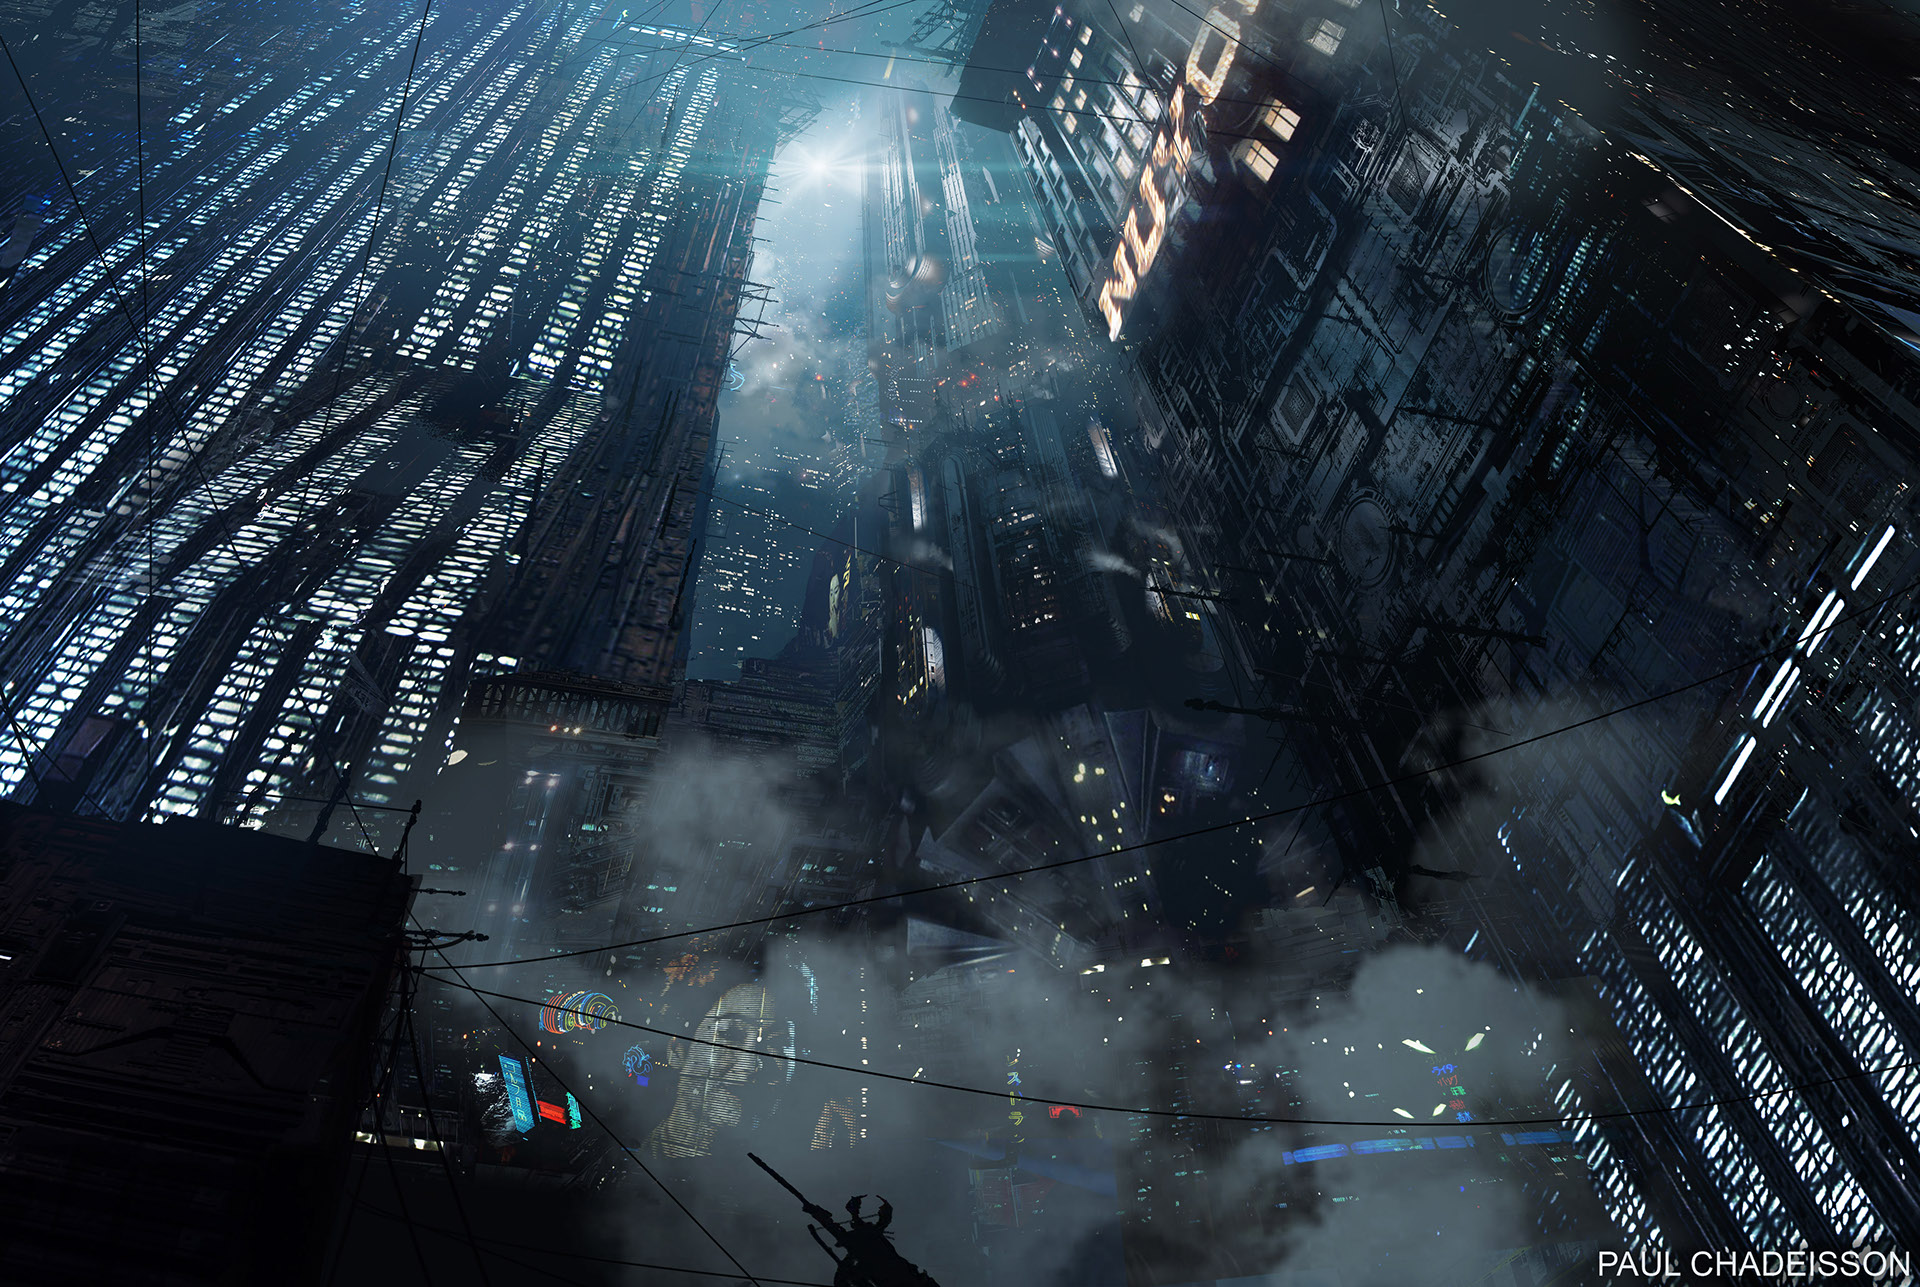 Design by Paul Chadeisson
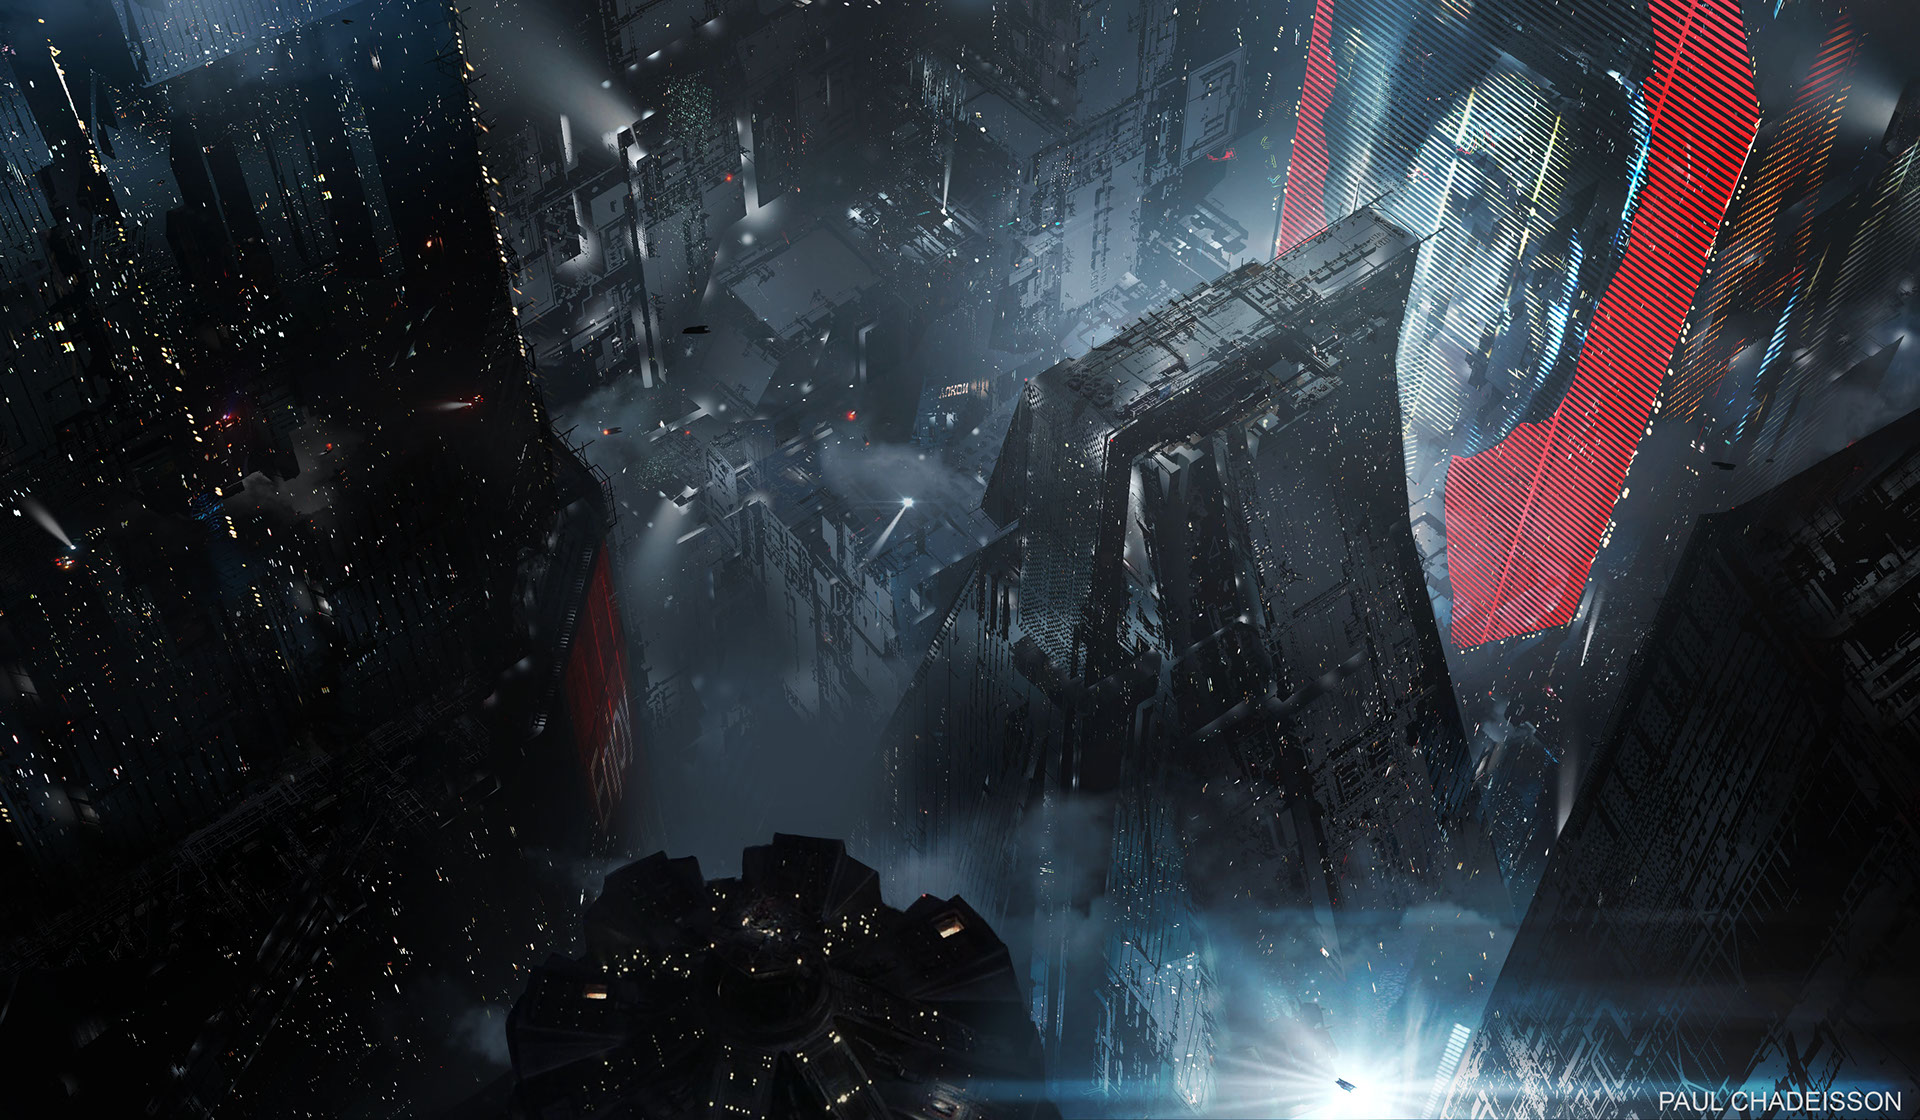 Design by Paul Chadeisson
 Design by Angelo Fajanilag
 Design by Angelo Fajanilag
 Design by Rico Jr Creation
 Design by Ladislas Chachignot
 Design by Richard Villarante
AoiroStudio
Oct 04, 2017
Source: Abduzeedo Illustration
October 2, 2017
Apple iPhone X Logo Effect – Pixelmator Tutorial
Apple iPhone X Logo Effect – Pixelmator Tutorial
I was watching the Apple iPhone event last month when I saw the iPhone X announcement. Then I visit Apple website to check out the information about the new phone and one thing that kept getting my attention was the new colorful logo. There was something familiar about it, I could not say what exactly. Then I realize that the color effect was quite similar to one of Pixelmator’s effects. I have used that effect in the past in one of my Pixelmator tutorial so I took the time last week to try to recreate Apples logo. After literally a couple of minutes I was able to come up with something that was quite convincing. Of course it will never be the same but it gives a good idea and the most important thing, it’s another set of skills for your tool belt.
Tutorial information:
- Tool: Pixelmator
- Duration: 10 minutes
- Difficulty: Easy
- Resources: Download source file
Step 1
Create a new document in Pixelmator and add the letter X. I believe Apple use Myriad Pro for the font, I don’t have it so I use Avenir Bold for this tutorial.
![]()
Step 2
Add a new layer and with the Paint Bucket Tool (N) fill the new layer with a dark blue.
![]()
Step 3
Create a mask group from the X, masking the blue background. After that go to Effects and select Light Leak. From the Light Leak options select Nebula. At this point the effect is 80% done.
![]()
Step 4
Create a new layer and with the Brush Tool start adding some highlight colors towards the center. I used #8E5900 for the color. After that change the Blending mode for that layer to Color Dodge.
![]()
Conclusion
At this point the effect is done but you can go a bit further by using some other light effects like the Floor effect. Always create a new layer and added it inside the X masked group. I had forgotten how cool Pixelmator was for this type of quick effects. It also makes me excited for the new version coming soon, the Pixelmator Pro. I might start writing a few more quick tutorials. If you have any suggestion, please let me know. Enjoy!
![]()
abduzeedo
Oct 02, 2017
Source: Abduzeedo Tutorials
October 2, 2017
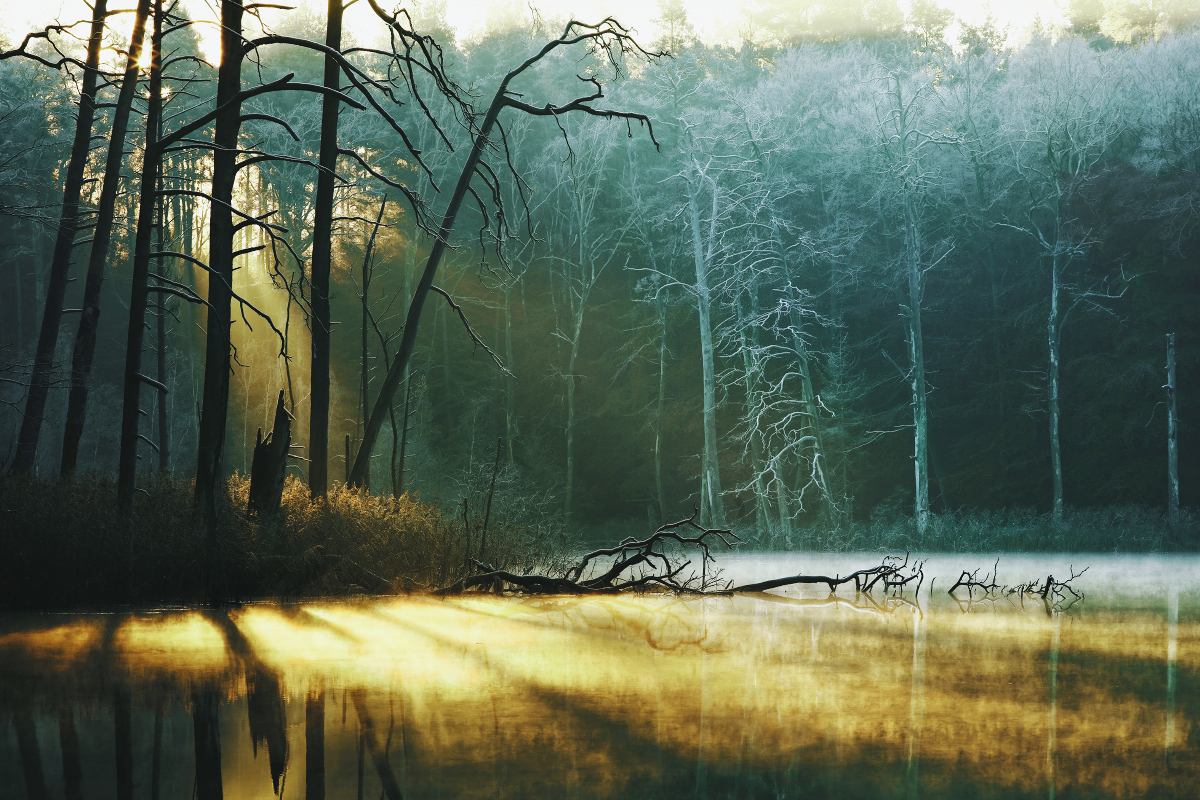
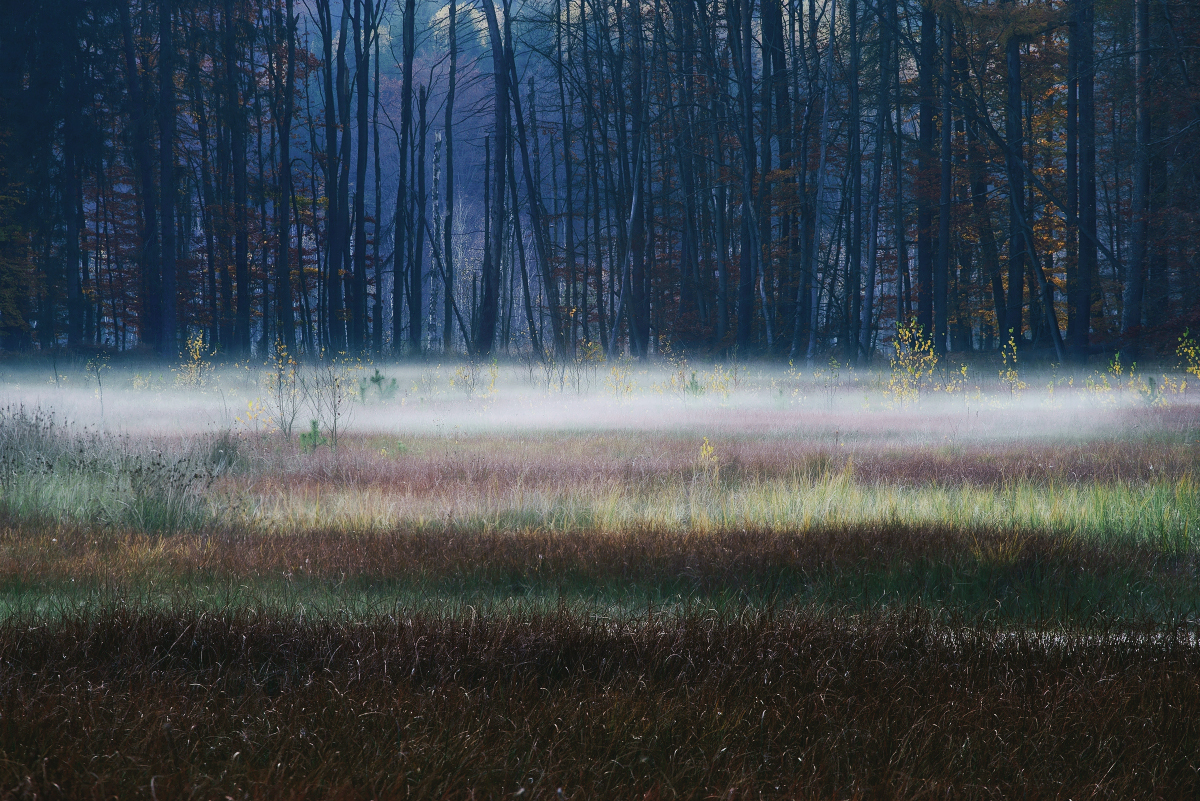
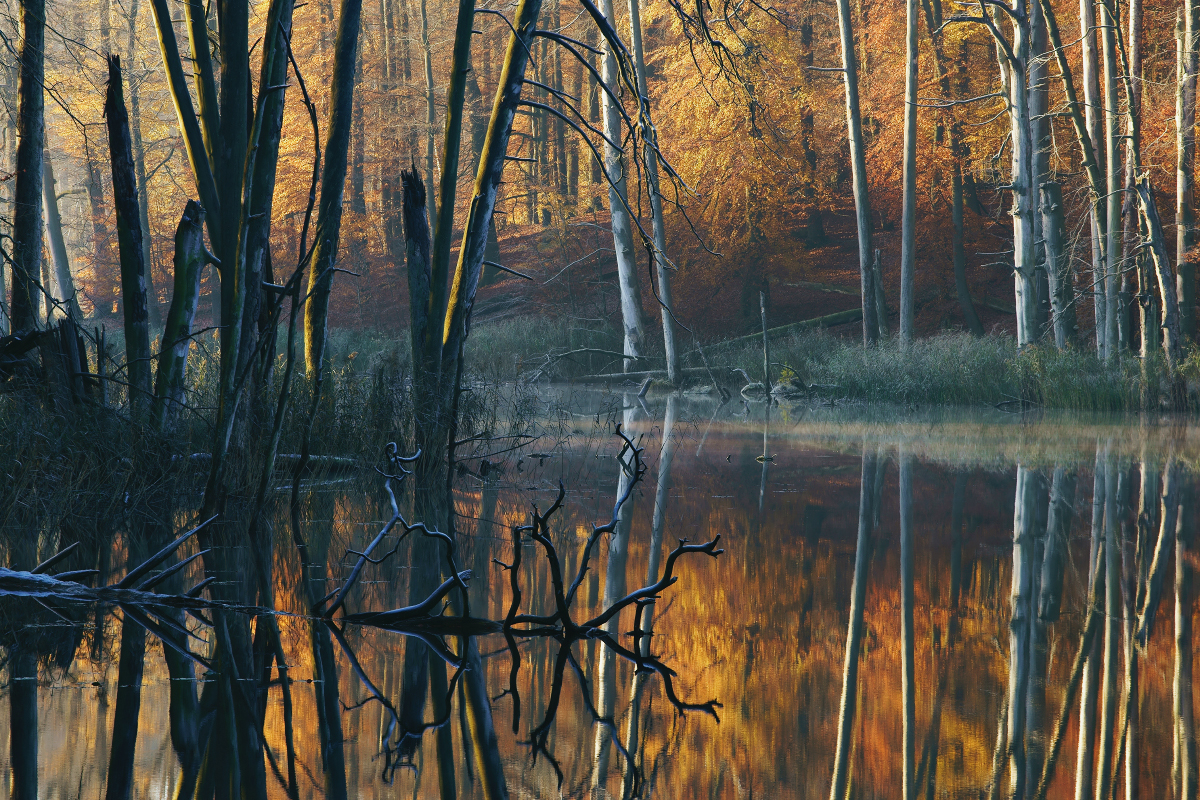
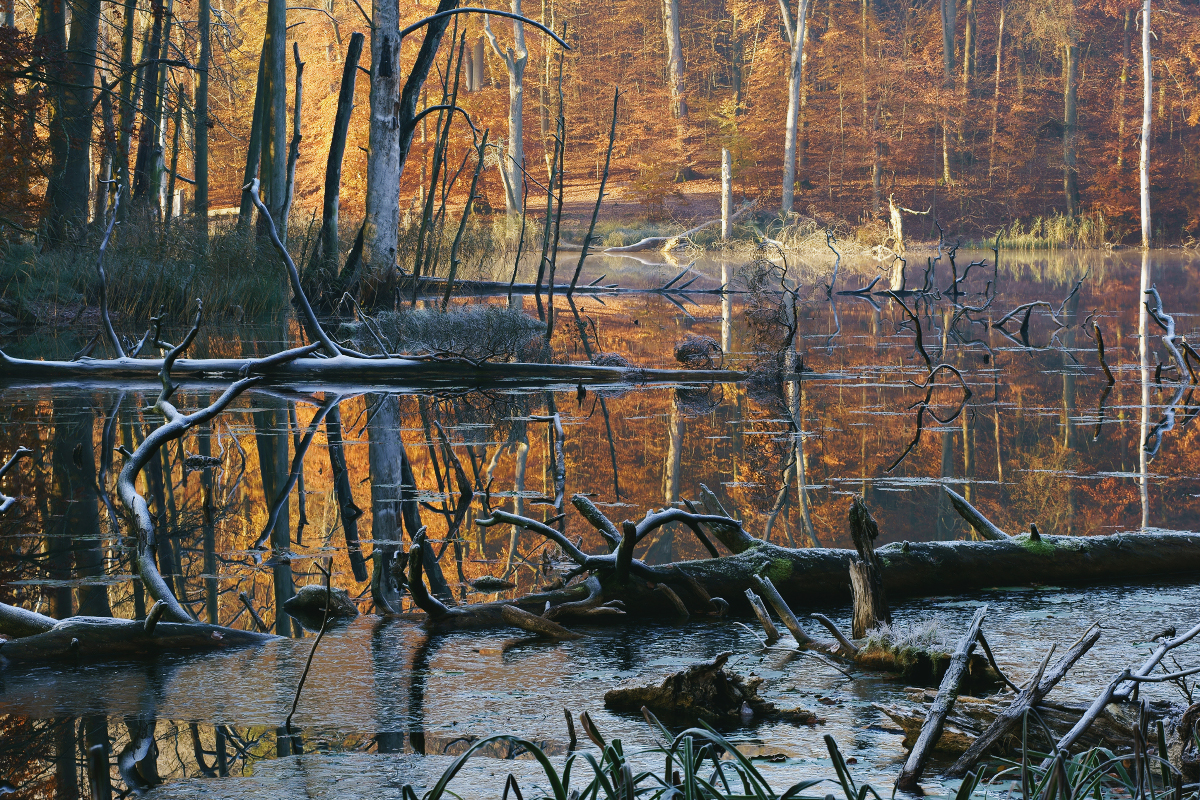
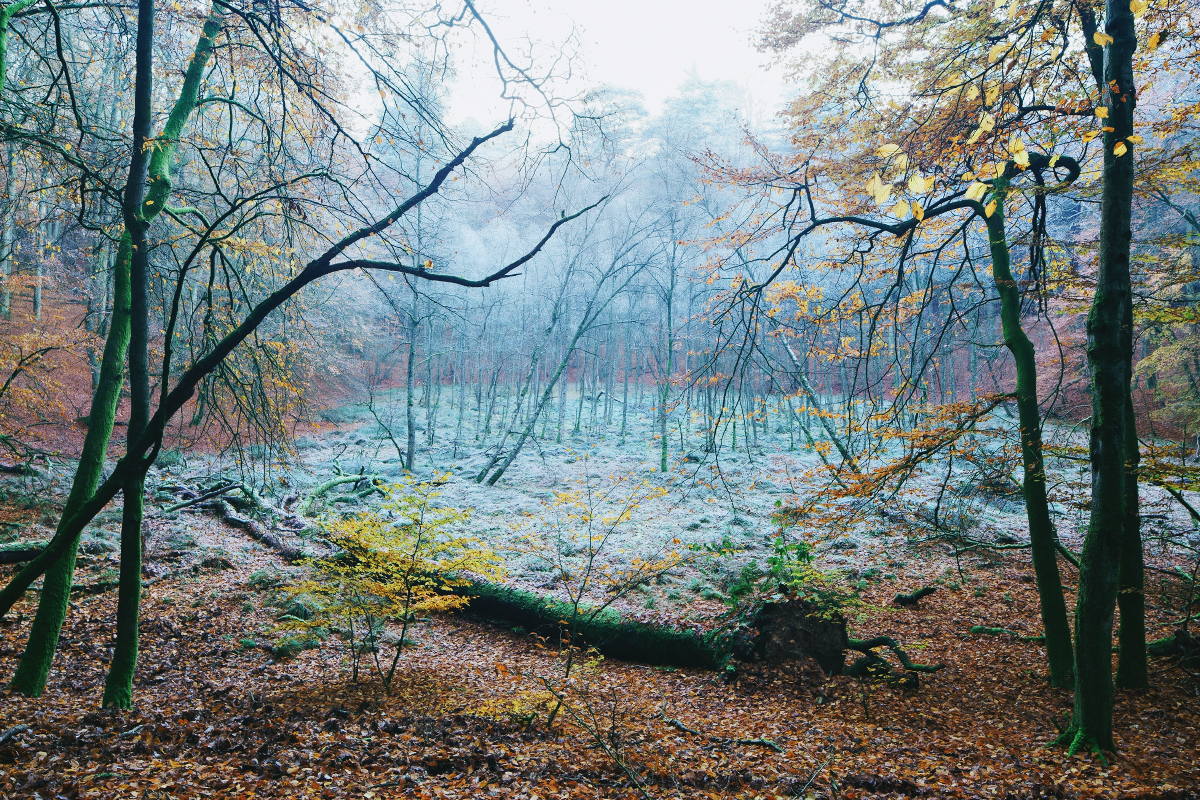
Digital Photography: Autumn At The Lake Series
Digital Photography: Autumn At The Lake Series
Sadly but summer is definitely over…I mean for those living in North! I will try not to think too much about Winter just yet. Instead, let’s enjoy the beautiful colours of Fall/Autumn which we adore before the actual cold. Let’s travel to Germany with photographer Kilian Schönberger so we can discover the beautiful colours of Autumn captured through Kilian’s camera and digital photography. Hope you will like this one!
Kilian Schönberger is a professional landscape and architect photographer based in Cologne, Germany.You should definitely follow via Behance for more of his photography works.
Autumn at the lake – a tribute to the hidden beauty of fading colours at the lakeside of one of the many beautiful lakes in north-east Germany. The quiet water surface is like a mirror of life. The reflection captures endless moments of reality like thousands and thousands of photos. The real and the mirrored world, the evanescent appeal of autumn – a strong subject of vanitas to me.
More Links
- Learn more about Kilian Schönberger at kilianschoenberger.de
- Follow Kilian on Instagram
Digital Photography


AoiroStudio
Oct 02, 2017
Source: Abduzeedo Photography
October 2, 2017
Mobile Photography: Moment V2 Review with Google Pixel
Mobile Photography: Moment V2 Review with Google Pixel
Moment is easily one of my favourite brands out there. It’s a statement that goes a long way from their innovation, sense of humor, content and more. They are actually giving us and building tools to improve our mobile photography. They do believe that the best camera is the one that you always carry with you. I am quite a believer in that notion. With their latest V2 gear, I was one of their backers from their Kickstarter campaign and I ordered the photo case for the Google Pixel. Combined Moment with what “used” to be the best camera out there, the results are just incredible. Let’s dive into the review!
My gear for the review
 Welcome to Moment V2
Links
 Shown is Photo Case (V2) and Original Photo Case (V1)
My Impressions
Coming from the first generation of Moment, this is an immense upgrade. Huge! For starters, the industrial design for the cases has been changed from scratch. It’s a totally new design. You get a refined slim design that still gives that everyday protection that you can attach with ease. Believe me, I have kids and they have dropped my phone many many times. Most importantly, it became even easier to attach a lens and boy it does feel solid in your pocket or backpack. It’s a functional case where I feel this might the last case that you will ever need.
 Shown is Original Lens Adapter
Caring for all the details
A little accessory that proves how Moment cares for their users and their brand. They have been producing what they called: Original Lens Adapter. What does it do? Well, it’s an adapter for your V1 lenses on the new mounting system (V2). It’s a small detail but it’s giving support for those who choose to purchase the new photo case without buying any new lenses. One thing though, once you attach that lens adaptor to your V1 lenses, just safely know that you will hardly be able to take it off ever again.
Product Gallery


New Wide Lens
With the current Google Pixel, we don’t have the luxury of having a dual camera lenses if we compared to the iPhone 8 Plus for example. Even though I don’t personally think it’s necessary to own a Tele lens. I am sure it’s great but I am having this feedback based on the everyday use. Where I would put my investment on is the V2 Wide Lens, without a doubt. First of all, it’s a new design from its predecessor, I would say that is almost twice bigger and it’s awesome. Having this lens mounted on your case, you will never want to take it off. It feels strong, well-fitted and doesn’t bother much on the balance when you are holding it. The result? The “5 layer aspherical optics” actually makes your pictures vibrant and giving you a stunning wide perspective.
V2 Wide Lens in the Wild


Final Words
Moment V2 is totally worth your investment! They are building the best of the best for us makers to keep on making and elevate our photography game. My ace to Moment for keeping us wanting for more and being part of our everyday carry. One tiny tip to end this review, take a look at their wide range of accessories including the useful Lens Pen.
More Links
- Follow my tweets @aoirostudio
- Follow me on Instagram
AoiroStudio
Oct 02, 2017
Source: Abduzeedo Photography
October 1, 2017
Inside Dolby Cinema: Tour of One of the Most Immersive Movie-Going Experiences Ever

An inside look at how Dolby Cinema aims to give you the absolute best movie-going experience.
Throughout history, movie theaters have evolved to attract new movie-goers. In the 1910s through the 1940s, movie “palaces” were ornately decorated theaters designed to provide patrons with an atmosphere mimicking an outdoor courtyard, complete with facades, fauna, and projectors called Brenograph that projected clouds and stars onto the ceiling.
Even though more modern cinemas don’t look anything like they did a century ago, theater owners still strive to give movie-goers a unique and immersive experience, whether it’s with the snacks and food, 3D, or stadium seating. Dolby Laboratories is one company that is aiming to take theater audio and visuals to places it has never been before, and the team over at RocketJump Film School got to take a tour of Dolby Headquarters based in San Fransisco to learn more about its premium cinema concept, Dolby Cinema.
Source: NoFilmSchool