-
Photoshop CC and Adobe Stock Tutorial: Creating a spooky Cinemagraph
November 2, 2017
November 2, 2017
Photoshop CC and Adobe Stock Tutorial: Creating a spooky Cinemagraph
Photoshop CC and Adobe Stock Tutorial: Creating a spooky Cinemagraph
It’s not usually our day to share a tutorial but why not. Thanks for our friends from Photoshop CC and Adobe Stock, we are sharing this cool tutorial about making a cinemagraph using those very same tools. Staying in the theme of Halloween since it’s still a novelty, also the tutorial is by Chris Converse from Codify Design Studio. Let’s take a look!
In Chris’s words
A cinemagraph captures the “moment in time” of a photograph, while incorporating the “cinematic effects” of motion. This combination gives us the experience of animation without the need to interpret a linear story. This means we have many more options for creating a cinemagraph experience. In this article, we’ll explore a workflow for creating a cinemagraph by compositing video, illustrations and photos with Adobe Photoshop.
Start with an Illustration from Adobe Stock
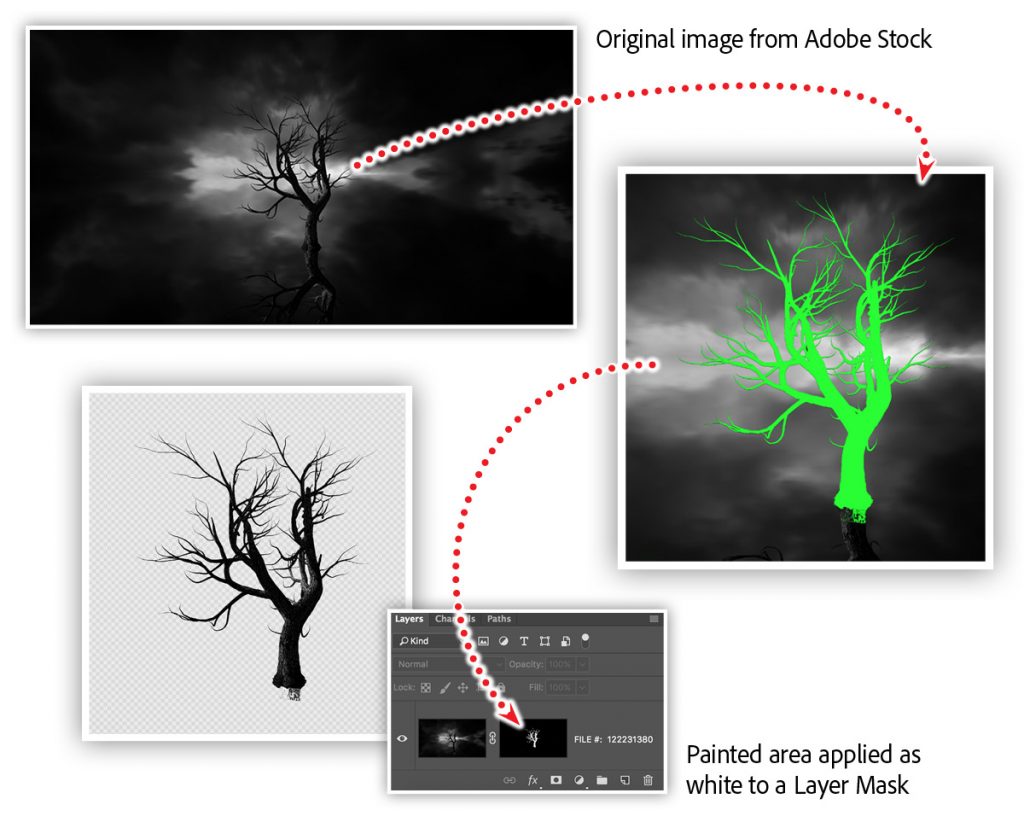
In searching Adobe Stock, I found this illustration of a spooky tree. I liked the black and white composition, and decided I’d like to keep that essence while replacing the background with moving clouds and fog. The first thing I needed to do was mask out the background. I created a new layer and began by painting over the branches of the tree with a bright color. I’ll admit, this was a bit tedious, even with a few selection tricks; but the fine detail really helped the final result.
Next, I loaded the pixels of the new layer as a selection. A short cut for this technique is to hold the Command key (Mac), or the Control key (Windows), and click the layer thumbnail icon. Then, select the original tree layer, and add a new layer mask.

The result is the branches of the tree appear in white on the layer mask, and the remaining appears in black. The result is a silhouette of the tree against a transparent background. Then, I simply added a new layer, moved it to the bottom, and filled the layer with a gradient from dark grey to black.
Adding the moon
Next, I searched Adobe Stock for a full moon. Once I found one I liked, I added the file to my composition as a linked Smart Object. In order to apply a mask, I editing the new Smart Object, added a circular layer mask

With the moon masked, add a 165 pixel white outer glow, with a spread of 6 and a blend mode of screen. This will create the effect of the moon glowing through dense clouds.
Working with video in Photoshop
Next, I downloaded two videos from Adobe Stock that we created to apply special effects for photos and video. I designed and animated these black and white videos to help you simulate cinematic effects for a cinemagraph, video, and motion graphic project. In the Photoshop file, open the Timeline panel and create a video timeline. Import a video into a layer by choosing File > Place Linked, then selecting the clouds.mp4 file. Note: If you use the “add media track” option ( the + button) in the Timeline panel, Photoshop will group the video into a video group. To remove the group, select it, and choose Layer > Ungroup

Position the clouds behind the tree and set the blend mode to screen. This will drop out the black areas of the video, and allow the moon to show through. Apply a layer mask and fade the right and left sides to be fully transparent. This will make the clouds appear to be lit by the mood. Next, import the fog video, convert to a Smart Object, then position it behind the tree. Duplicate the fog video Smart Object, and position the copy above the tree. This will create some depth within the fog. Add a layer mask to both fog video layers. On the further back fog layer, set the opacity to 30% and mask the right and left edges to be transparent. This will create the same effect for the fog that we set for the clouds.

Finally, mask the right and left edges even further than the back layer, giving the illusion that this fog is even closer.
Render
The fastest growing file format for a cinemagraph is video, specifically an mp4. This file format allows for many more frames than an animated GIF, and results in a much smaller, single file. While CSS- and JavaScript-based cinemagraphs can be even smaller and randomized, they do require more files, and are a subject for another article. To render a video from Photoshop, select Render Video from the File > Export menu.

More Links
- Adobe Stock Resources: Background and Moon
- Learn more about Chris Converse at chrisconverse.com
Via Adobe Blogs
AoiroStudio
Nov 02, 2017
Source: Abduzeedo Tutorials
0 Comments
Leave A Comment